


![]()
PayPal Payment Buttons
Add PayPal payment buttons to allow fast and easy payments to your PayPal account without requiring the client to have a PayPal Account
Install the Gateway
-
Upload the source code to a /components/gateways/nonmerchant/paypal_payment_buttons/ directory within your Blesta installation path.
For example:
/var/www/html/blesta/plugins/paypal_payment_buttons/ -
Log in to your Blesta admin area and navigate to:
/admin/settings/company/gateways/available/ -
Find the PayPal Payment Buttons gateway and click the "Install" button to install it
-
You're done!
Setting up
Quick Support
Where can I find my Client ID and Secret?
- Go to this link: https://developer.paypal.com/, and login using the "Log in to Dashboard" button in the top right
- Once you're logged in, go to https://developer.paypal.com/developer/applications
- Under "My apps & credentials" press "Live"
- Click on "Create App" or on your app if it already exists
- Copy over your PayPal account, Client ID and press on "Show" under Secret to reveal your Client Secret
![]()
PayPal Payment Buttons Gateway by Blesta.Club - Installation Guide
Welcome, and thank you for purchasing the PayPal Payment Buttons Gateway! We're excited to have you as a customer and are committed to ensuring you have a seamless experience. This README will guide you through the installation of your new gateway. If you're new to Blesta or encounter any issues, please don't hesitate to reach out for support.
Installation Guide
To install the PayPal Payment Buttons Gateway, please follow these steps:
-
Obtain the Gateway:
- Download the PayPal Payment Buttons Gateway from the download section of the client area.
-
Upload to Blesta:
- Upload the PayPal Payment Buttons Gateway to your Blesta gateways directory:
/var/www/html/blesta/components/gateways/nonmerchant/paypal_payment_buttons/
- Upload the PayPal Payment Buttons Gateway to your Blesta gateways directory:
-
Install the Gateway:
- Log in to your Blesta admin account.
- Navigate to Settings > Payment Gateways.
- Find the PayPal Payment Buttons Gateway under the "Available" tab and click the "Install" button.
Setting Up the Gateway
-
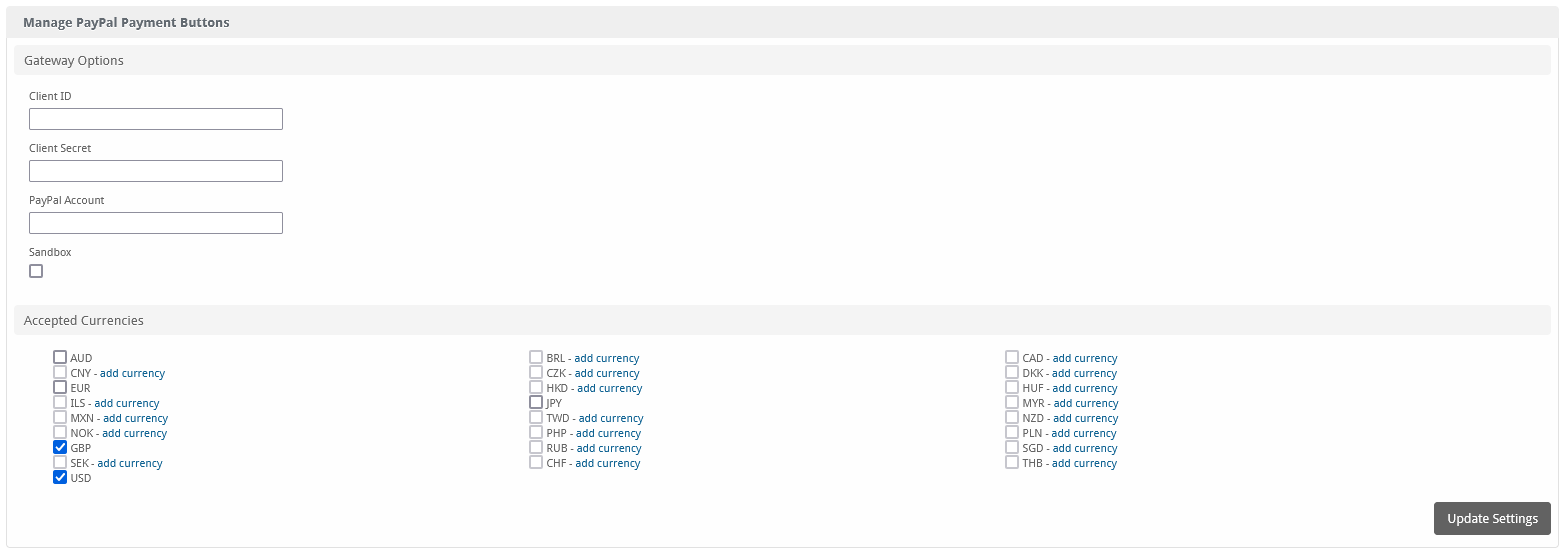
Configure the Gateway:
- Navigate to Settings > Payment Gateways (
/admin/settings/company/gateways/installed/). - Find the "PayPal Payment Buttons" Gateway and click on "Manage".
- Input your PayPal email and other necessary settings like currency and payment preferences.
- Navigate to Settings > Payment Gateways (
-
Enable Payment Processing:
- After configuring, ensure the gateway is enabled for use in your Blesta system order forms.
You're now done with the installation! Proceed to configure the gateway as needed by following the usage guide.
Contact Us
If you encounter any issues or have suggestions for improving the gateway, please get in touch with us. We are committed to providing robust updates and welcome customer feedback.
![]()
PayPal Payment Buttons Gateway by Blesta.Club - Update Guide
To ensure you're always using the latest version of the PayPal Payment Buttons Gateway, follow these steps to update the gateway within your Blesta installation.
Steps for Updating the Gateway
1. Download the Latest Version
- Visit the download section to obtain the latest version of the PayPal Payment Buttons Gateway.
2. Upload the Updated Gateway
- Upload the updated files to your Blesta installation directory, replacing the existing files.
- The directory path is:
/var/www/html/blesta/components/gateways/nonmerchant/paypal_payment_buttons/
3. Update the Gateway in Blesta
- Log in to your Blesta admin account.
- Navigate to Settings > Payment Gateways.
- Locate the PayPal Payment Buttons Gateway in the list and click the "Upgrade" button, if available.
4. Check Configuration
- After the update, review your PayPal email and payment settings to ensure they are correctly configured. Navigate to Settings > Payment Gateways and manage the PayPal Payment Buttons Gateway to verify the settings.
Testing the Update
-
Test Mode:
- Before switching back to live transactions, you may want to test the gateway in PayPal’s sandbox mode to ensure everything works as expected.
-
Transaction Testing:
- Perform a test transaction using the updated gateway to ensure that payments are processed successfully.
Troubleshooting Update Issues
-
Missing or Incorrect Files:
- If you experience issues after updating, ensure all files have been uploaded correctly to the appropriate directory.
- Check file permissions to ensure the web server can access the updated files.
-
PayPal Email Issues:
- If transactions are failing after the update, verify that the correct PayPal email is configured in the gateway settings. Ensure that you're using live credentials for real transactions and sandbox credentials for testing purposes.
-
Version Compatibility:
- Make sure the updated version of the gateway is compatible with your current version of Blesta. Refer to the changelog or update notes for any breaking changes or version requirements.
Contact Us
If you encounter any issues during the update process or have suggestions for improving the gateway, please reach out to us. We are dedicated to providing consistent updates and value your feedback.
![]()
PayPal Payment Buttons Gateway by Blesta.Club - Usage Guide
Welcome, and thank you for purchasing the PayPal Payment Buttons Gateway! We're excited to help you get the most out of your new gateway. This guide will walk you through how to use the gateway effectively. If you're new to Blesta or encounter any issues, please don't hesitate to reach out for support.
Gateway Capabilities
The PayPal Payment Buttons Gateway allows clients to pay for services directly through PayPal using custom payment buttons. Below are the key features of the gateway:
Using the Gateway
Once installed and configured, the PayPal Payment Buttons Gateway will be available for clients to use when paying for their services.
Client View
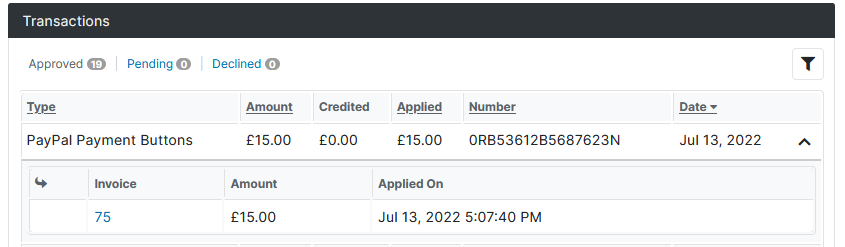
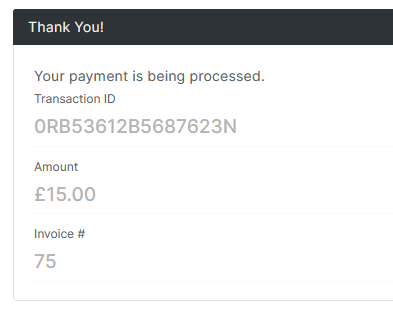
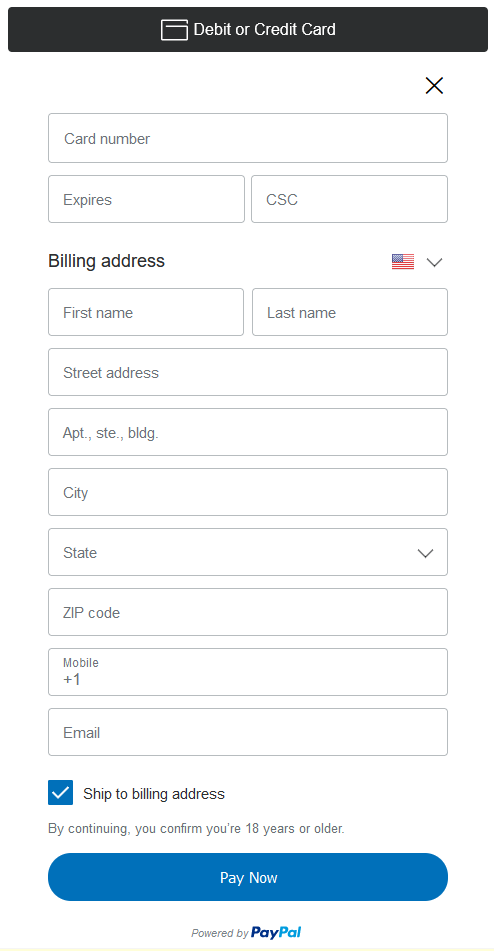
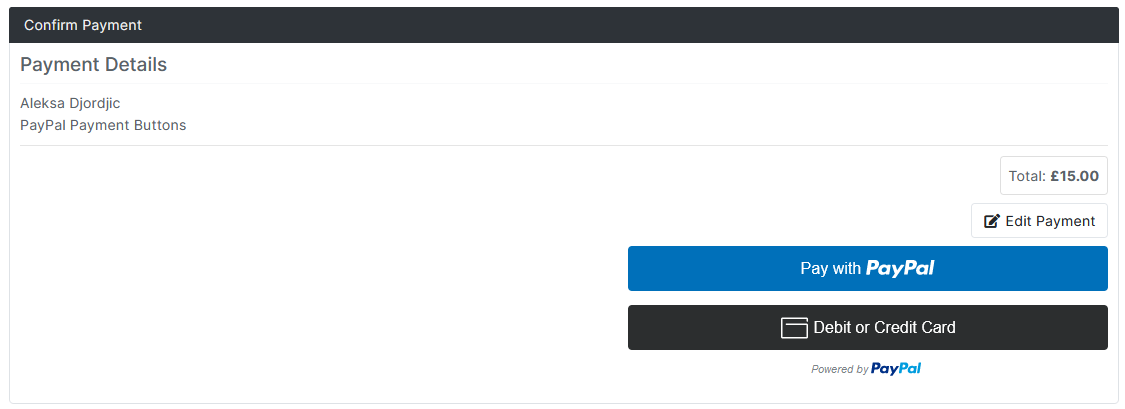
- When clients view their invoices, they will see a "Pay with PayPal" button, allowing them to process the payment securely via PayPal.
- Clients are redirected to PayPal’s website where they can complete the payment.
Configuring Payment Options
-
Configure Payment Button:
- Navigate to Settings > Payment Gateways in the Blesta admin panel (
/admin/settings/company/gateways/installed/). - Customize the payment button settings as per your business needs, including payment preferences and currency options.
- Navigate to Settings > Payment Gateways in the Blesta admin panel (
-
Enable PayPal Button for Invoices:
- In your order form, ensure that the PayPal Payment Button is enabled for client payments.
Testing the Gateway
- Test Mode:
- Use PayPal’s sandbox environment to test transactions before going live. This helps you verify that everything is functioning as expected.
- Switch to Live Mode:
- Once testing is complete, make sure to switch your PayPal account from sandbox to live mode for real transactions.
Troubleshooting Common Issues
- Transaction Failures:
- Verify that the correct PayPal email is set in the gateway configuration and that your PayPal account is set to live mode.
- Currency Mismatch:
- Ensure that the currency settings in Blesta match the currencies accepted by your PayPal account to avoid processing errors.
Contact Us
If you encounter any issues or have suggestions for improving the gateway, please get in touch with us. We are committed to providing robust updates and welcome customer feedback.
--- v1.0.0 - 2024-09-22 ---
Blesta Club release
Pricing Options
Get exactly what you need and want.
Bundled
- +20 Other Extensions
- Additional Discounts
- Included Support & Updates
Leased
- Partially Encoded
- Full Functionality
- Included Support & Updates
Owned
- Partially Encoded
- Buy Once Use Forever
- 1 Year Support & Updates
Owned - Source
- Source Available
- Buy Once Use Forever
- 1 Year Support & Updates
Reviews
What our customers say
(0 customer reviews)
Seems like this extension doesn't have reviews yet...
Be one of the firsts to leave a review!
It is possible to leave a review only if you have purchased this extension or a bundle which contains it.
We reserve the right to alter wording or formatting for presentation.
We will discuss any changes made and offer the option to withdraw review text if the changes can't be agreed on.
It may take up to 1 hour for a review to appear or update due to caching.