20i Reseller
The 20i Reseller module allows you to offer hosting services to your clients. This module integrates with Blesta to automate the provisioning and management of 20i hosting accounts, making it easy to provide 20i accounts without intervention.
From £24.99 - View Pricing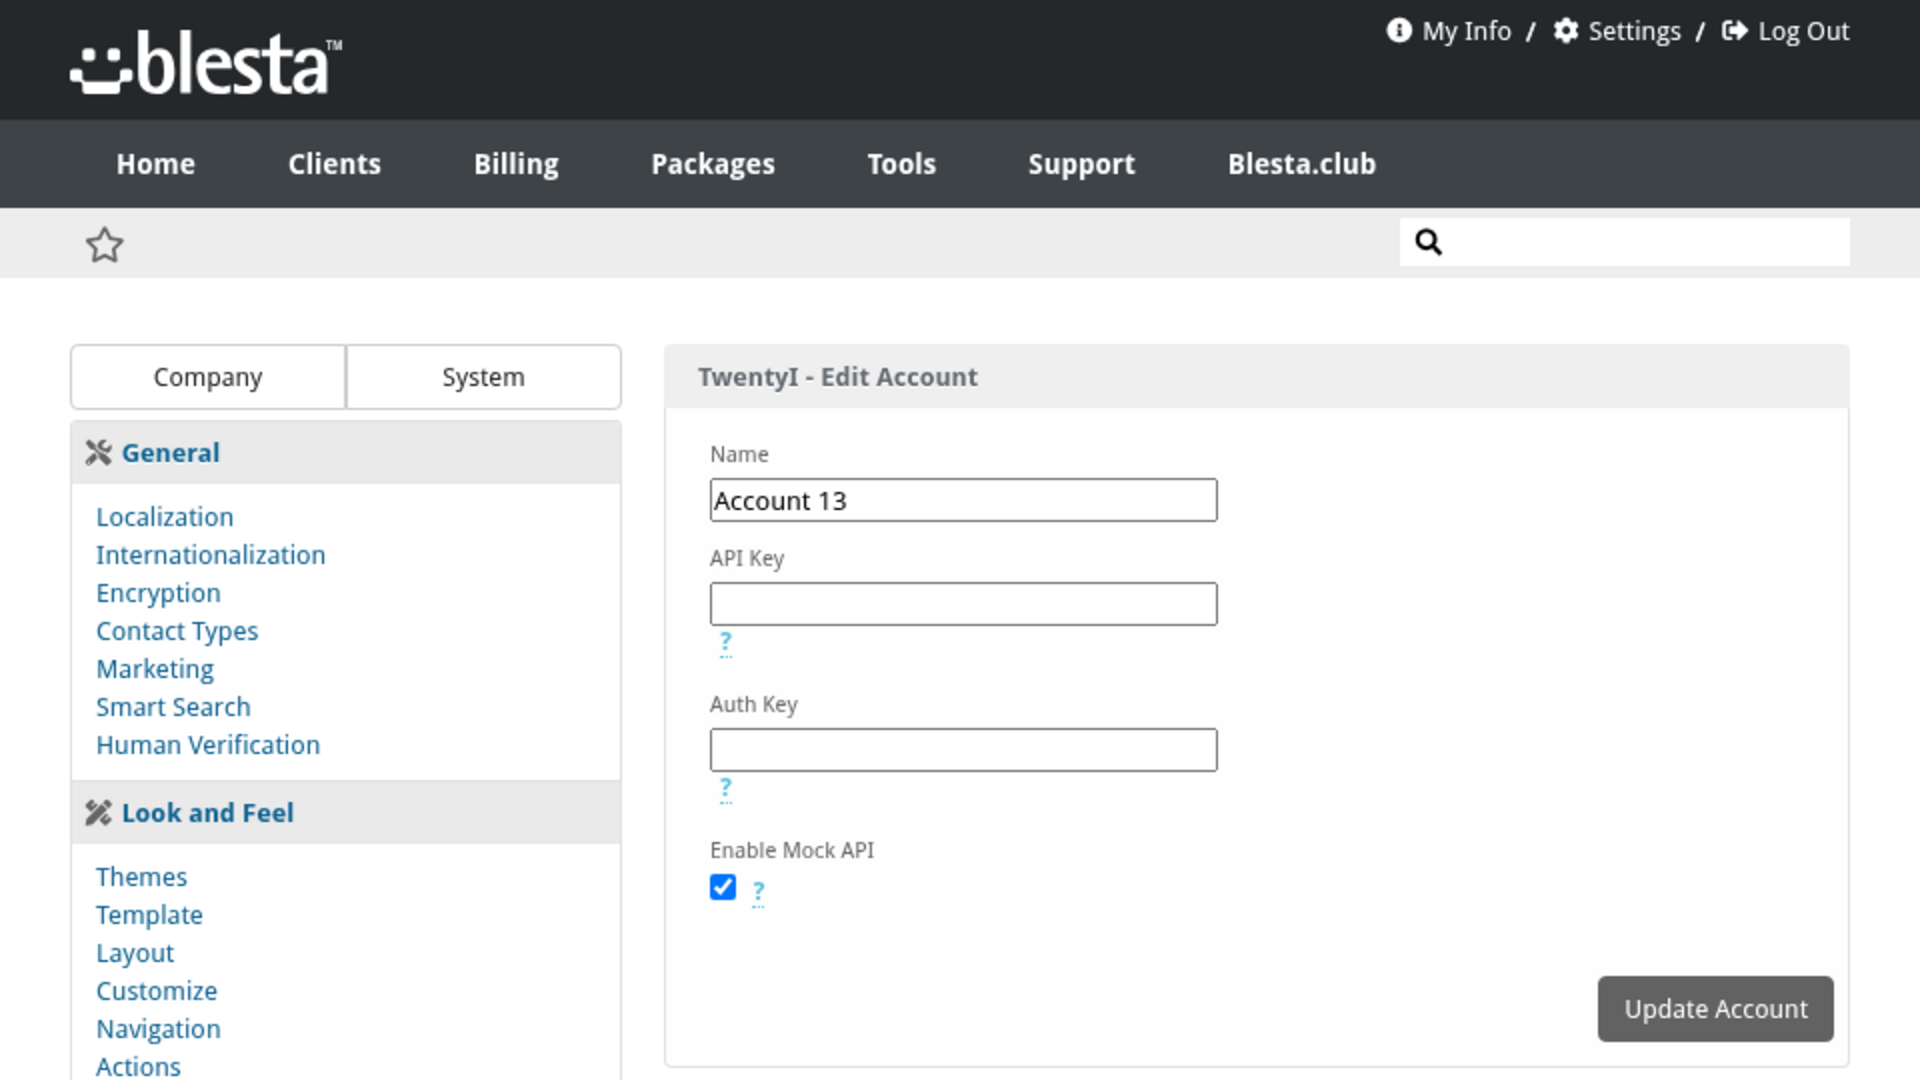
Features
What 20i Reseller gives you
Staff and Client Area
Gives both your staff and your clients a purpose-built interface in their own area of Blesta.
Choose the Datacentre
Pick whether a package is provisioned in London, UK or Dallas, US so clients are hosted close to their audience.
Per-Company Configuration
Configure it independently for each brand on a multi-company install, so every company runs with its own settings.
Fully Translatable
Every staff and client label ships in editable language files, ready to translate into any language or reword to match your brand.
Built-In Demo Mode
A built-in demo mode runs the whole extension from bundled sample data, so you can trial every screen and action before you have an account or API key.
Linux and Managed WordPress
Choose the platform a package sells and the package-type list rebuilds for it, so Linux hosting and Managed WordPress plans are both sold from the same module.
Credentials Checked Before They Are Saved
Adding an account authenticates the reseller API key and the auth key against 20i, so a typo is caught immediately instead of surfacing as a failed order later.
Ready-Made Welcome Email
A welcome email template ships with the extension and loads onto any package in one click, already filled with the details the client needs to start using what they bought.
Full Lifecycle Automation
Suspension, reactivation, cancellation, and upgrades or downgrades between plans are all pushed to 20i automatically, so a failed payment or a plan change needs no manual follow-up.
One-Click Control Panel Login
Clients open their branded StackCP control panel straight from their Manage tab without a second password, and staff get the same button on the staff side of the service for support work.
Named Reseller Accounts
Give each 20i account a name so multiple reseller accounts are easy to tell apart, and both API keys are stored encrypted, never shown again, and kept when you leave the field blank on an edit.
Automatic Hosting Provisioning
A paid order creates the hosting package on 20i under the client's own stack user, matched to them by email and created for them if they are new, so a customer is live within seconds of checkout.
Sell Every Tier From One Package
Attach Blesta configurable options named for the package's own settings and clients pick their own sizing or extras at checkout, overriding or adding to the package defaults - so one package can sell your whole range.
Service Status at a Glance
The staff and client service pages show the hosting package's domain and its current status - active, suspended, cancelled, pending, or in review - so support and clients see the same summary without opening the control panel.

20i
Resell 20i shared hosting from Blesta, with hands-off provisioning and a one-click login into the client's control panel.
What it does
Selling 20i reseller hosting through Blesta normally means creating the hosting account by hand after every order, then fielding support requests for control panel access. This module closes that gap: the moment a client's order is paid, their hosting package is created directly on your 20i reseller account and matched to their own login, no manual step in between. From then on, suspensions, cancellations and plan changes all flow through to 20i automatically, and both you and your client can jump straight into the branded control panel from the service page in Blesta, without a second password to remember.
Key features
- Automatic Hosting Provisioning: A paid order creates the hosting package on 20i under the client's own stack user, matched to them by email and created for them if they are new, so a customer is live within seconds of checkout.
- One-Click Control Panel Login: Clients open their branded StackCP control panel straight from their Manage tab without a second password, and staff get the same button on the staff side of the service for support work.
- Linux and Managed WordPress: Choose the platform a package sells and the package-type list rebuilds for it, so Linux hosting and Managed WordPress plans are both sold from the same module.
- Choose the Datacentre: Pick whether a package is provisioned in London, UK or Dallas, US so clients are hosted close to their audience.
- Full Lifecycle Automation: Suspension, reactivation, cancellation, and upgrades or downgrades between plans are all pushed to 20i automatically, so a failed payment or a plan change needs no manual follow-up.
- Service Status at a Glance: The staff and client service pages show the hosting package's domain and its current status - active, suspended, cancelled, pending, or in review - so support and clients see the same summary without opening the control panel.
- Named Reseller Accounts: Give each 20i account a name so multiple reseller accounts are easy to tell apart, and both API keys are stored encrypted, never shown again, and kept when you leave the field blank on an edit.
- Credentials Checked Before They Are Saved: Adding an account authenticates the reseller API key and the auth key against 20i, so a typo is caught immediately instead of surfacing as a failed order later.
- Sell Every Tier From One Package: Attach Blesta configurable options named for the package's own settings and clients pick their own sizing or extras at checkout, overriding or adding to the package defaults, so one package can sell your whole range.
- Ready-Made Welcome Email: A welcome email template ships with the extension and loads onto any package in one click, already filled with the details the client needs to start using what they bought.
- Built-In Demo Mode: A built-in demo mode runs the whole extension from bundled sample data, so you can trial every screen and action before you have an account or API key.
Installing and updating extensions can now be done automatically through the Blesta Club Subscription Manager - this is the recommended way going forward.
Installing 20i
Before you start
- Version 3.x requires Blesta 6.0 or later. On a Blesta 5 install, use version 2.x instead.
- If you are on the leased (subscription) licence, the Blesta Club Subscription Manager must be installed and your subscription active. The owned and owned-source licences have no such requirement.
- You will need a 20i reseller account, with its reseller API key and auth key. If you just want to try the module out first, you can skip this and use the built-in demo mode instead (see step 3 below).
1. Upload the files
Upload the extension folder into your Blesta installation so it lands under your Blesta directory at:
components/modules/twentyi/For example, on a typical install: /var/www/html/blesta/components/modules/twentyi/
2. Install it in Blesta
- Log in to your Blesta admin area with a staff account that has the Modules permission (found under Settings > System > Staff > Staff Groups, on the group's permission list). If your staff group restricts access per module, also grant the Manage Module permission.
- Go to Settings > Company > Modules and click the Available tab.
- Find 20i in the list and click Install.
3. Configure it
- Under Settings > Company > Modules > Installed, click Manage next to 20i.
- Add an account: give it a name (used to tell multiple 20i accounts apart), then paste in your 20i reseller API key and your 20i auth key, both generated inside your 20i reseller dashboard. Tick Enable Mock API to run the account entirely from built-in sample data instead, so you can try every screen before connecting a real account. Save.
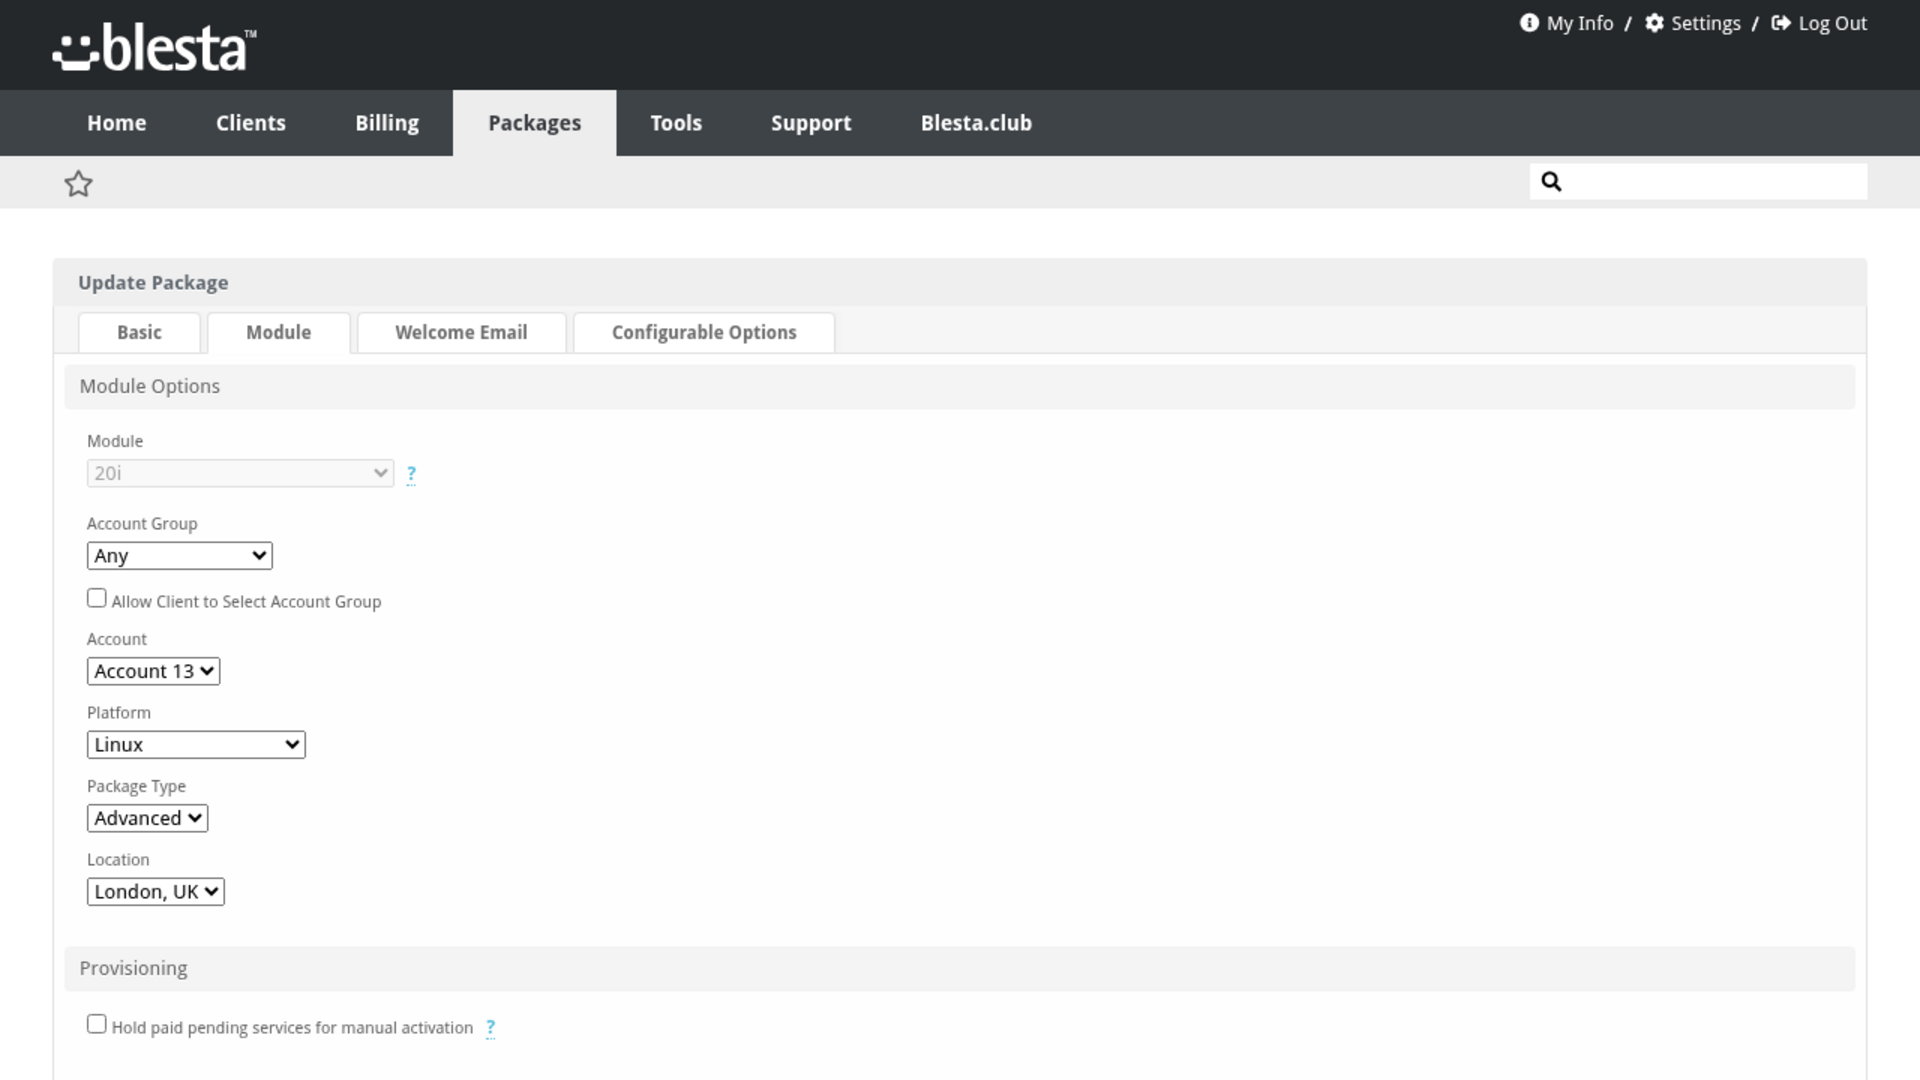
- When you create or edit a hosting package, open its module fields, choose which account (or account group) provisions it, then pick the platform (Linux or Managed WordPress), the package type 20i offers for that platform, and the datacentre location (London, UK or Dallas, US).
- Optionally, open the package's Welcome Email tab and load the module's ready-made welcome email template, which is pre-filled with the client's domain, package type, and location.
No cron task or webhook needs to be configured - provisioning, suspension, cancellation and plan changes are all triggered directly by the matching action in Blesta.
You're ready to go - see the usage guide for a walkthrough of day-to-day use.
Installing and updating extensions can now be done automatically through the Blesta Club Subscription Manager - this is the recommended way going forward.
Updating 20i
Upgrading works just like installing: upload the new files over the old ones, then run the upgrade from the same page you installed it on.
- Back up your current extension files first - good practice before any upgrade.
- Upload the new version over the existing folder, replacing the old files.
- Log in to your Blesta admin area and go to Settings > Company > Modules.
- Find 20i under Installed and click Upgrade to run the update.
Version-specific notes
- 3.0.0: Requires Blesta 6.0 or later - upgrade Blesta first, then the module. Blesta 5 installs should stay on 2.x. Nothing changes in your accounts, packages or services; the staff screens simply take on the Blesta 6 admin theme, and the Edit and Delete links on the account list become buttons. Packages set to "Choose Automatically" through an Account Group used to fail with "The module row is unavailable"; from 3.0.0 a group always provisions on its first account (the Add/Edit Account Group form shows this as the order "First Account in the Group"). Groups created under an older version work as they are, nothing needs re-saving.
- 2.0.0: Each 20i service now has its own Manage tab with the control panel login button, replacing the login link that used to sit directly on the service page. Existing reseller accounts are automatically given a placeholder name ("Account
") the first time this version runs - rename them from the Manage page whenever you like. A ready-made welcome email template is now available to load onto your packages, and Managed WordPress package types can now be offered alongside Linux by setting a package's platform. - 1.1.0: Your stored API and auth keys are automatically re-saved in encrypted form the first time this version runs - no action needed on your part.
Both migrations run automatically the first time the upgraded module loads; there is nothing to configure by hand.
Using 20i
For your staff
Managing your 20i accounts
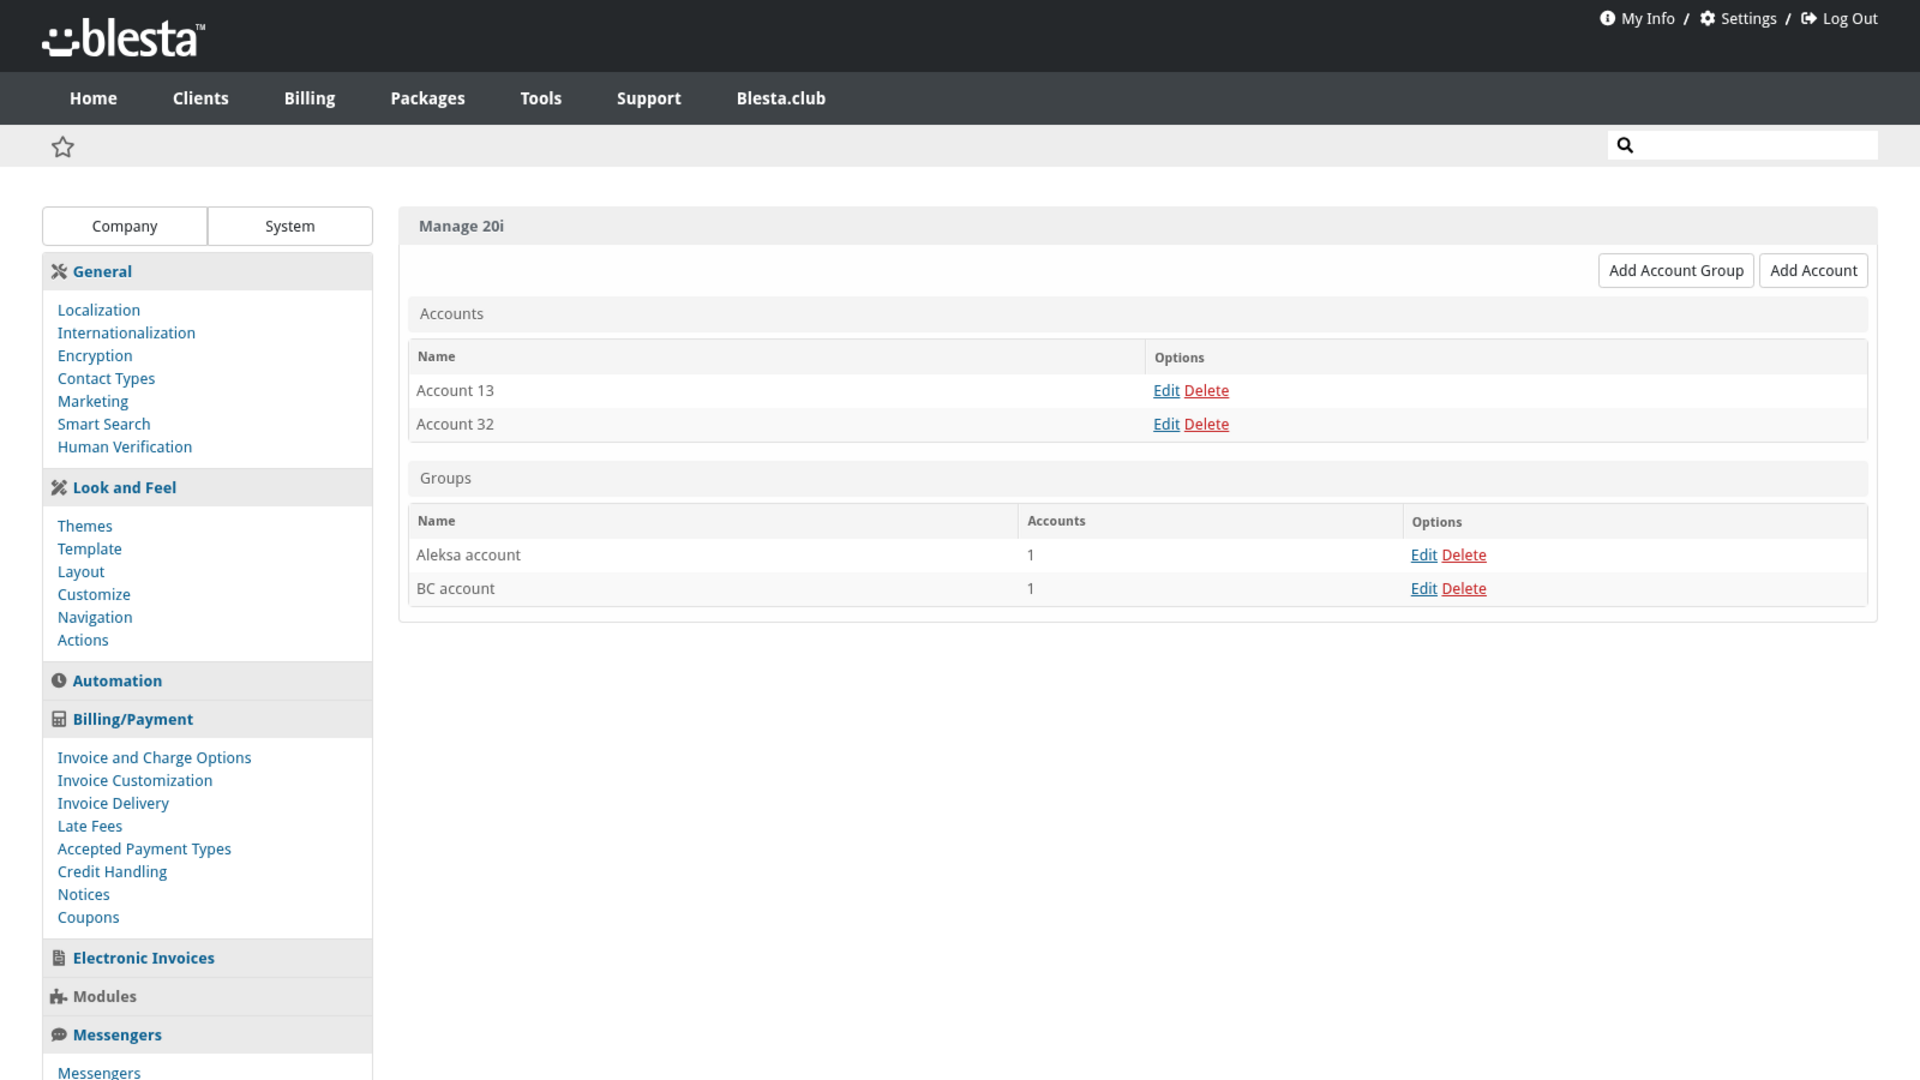
Go to Settings > Company > Modules > Installed, then click Manage next to 20i. This page lists every 20i reseller account you have connected, by the name you gave it.
- Add Account opens a form for a Name, an API Key (your 20i reseller key) and an Auth Key (your 20i auth key), plus an Enable Mock API checkbox. Both keys are stored encrypted and are never shown again once saved.
- Edit reopens that same form for an existing account. The key fields are always blank on this screen - leave them blank to keep the stored key, or type a new value to replace it. Ticking or unticking Mock API re-checks the account's credentials against 20i the next time you save with a key present.
- Delete removes an account after a confirmation prompt.
Setting up a hosting package
On a package's module fields, choose which 20i account (or account group) provisions it, then pick the Platform (Linux or Managed WordPress) - the Package Type list rebuilds automatically to match whichever platform you pick - and the Location the package is provisioned in (London, UK or Dallas, US). These three settings are what every service on the package is provisioned with, unless a client overrides them through a configurable option (see below).
Selling variants of a package with configurable options
Attach a Blesta configurable option named to match the package's own type or location field, and a client's choice at checkout overrides that package's default for their service. This lets one package sell every 20i tier and both locations, instead of needing a separate package per combination.
The welcome email template
Every package's Email tab can load a ready-made welcome email for 20i services, pre-filled with the client's domain and the package's type and location. Load it once and edit the wording to match your brand if you like.
Managing a client's hosting service
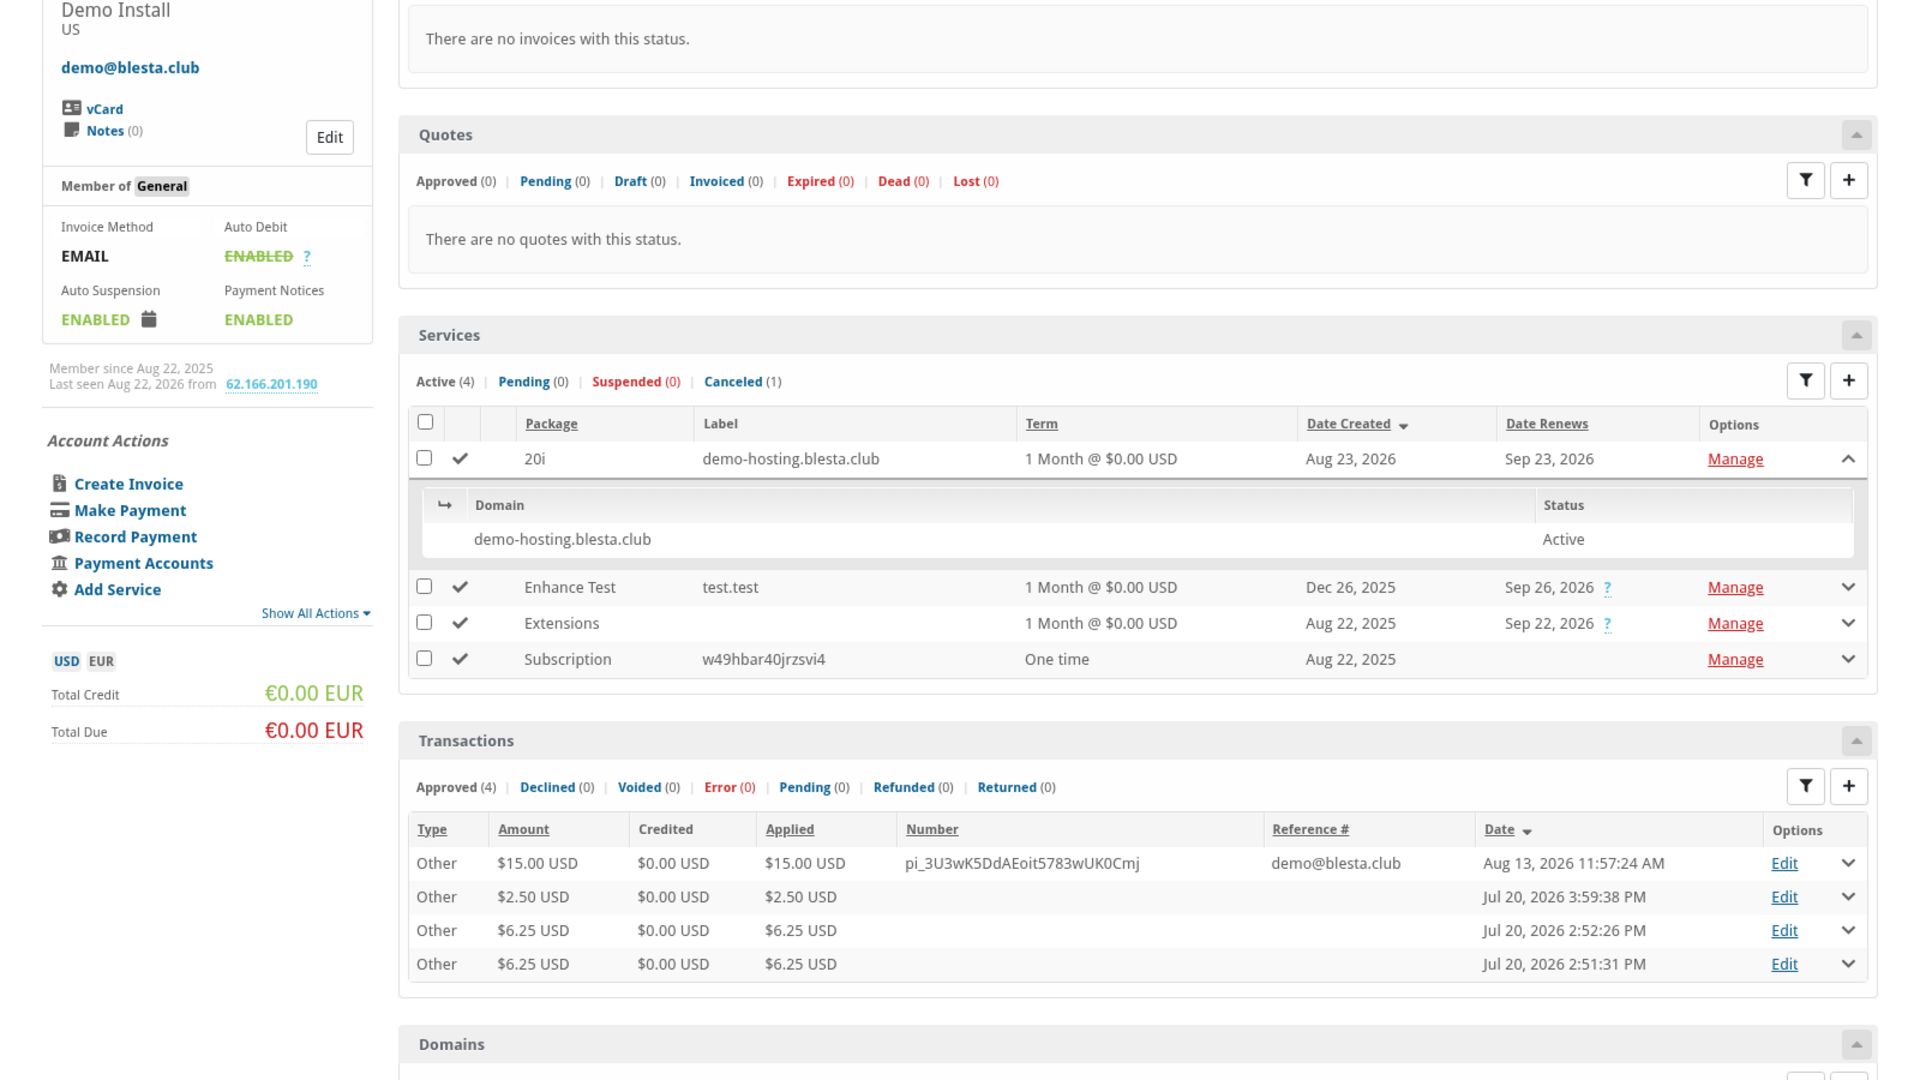
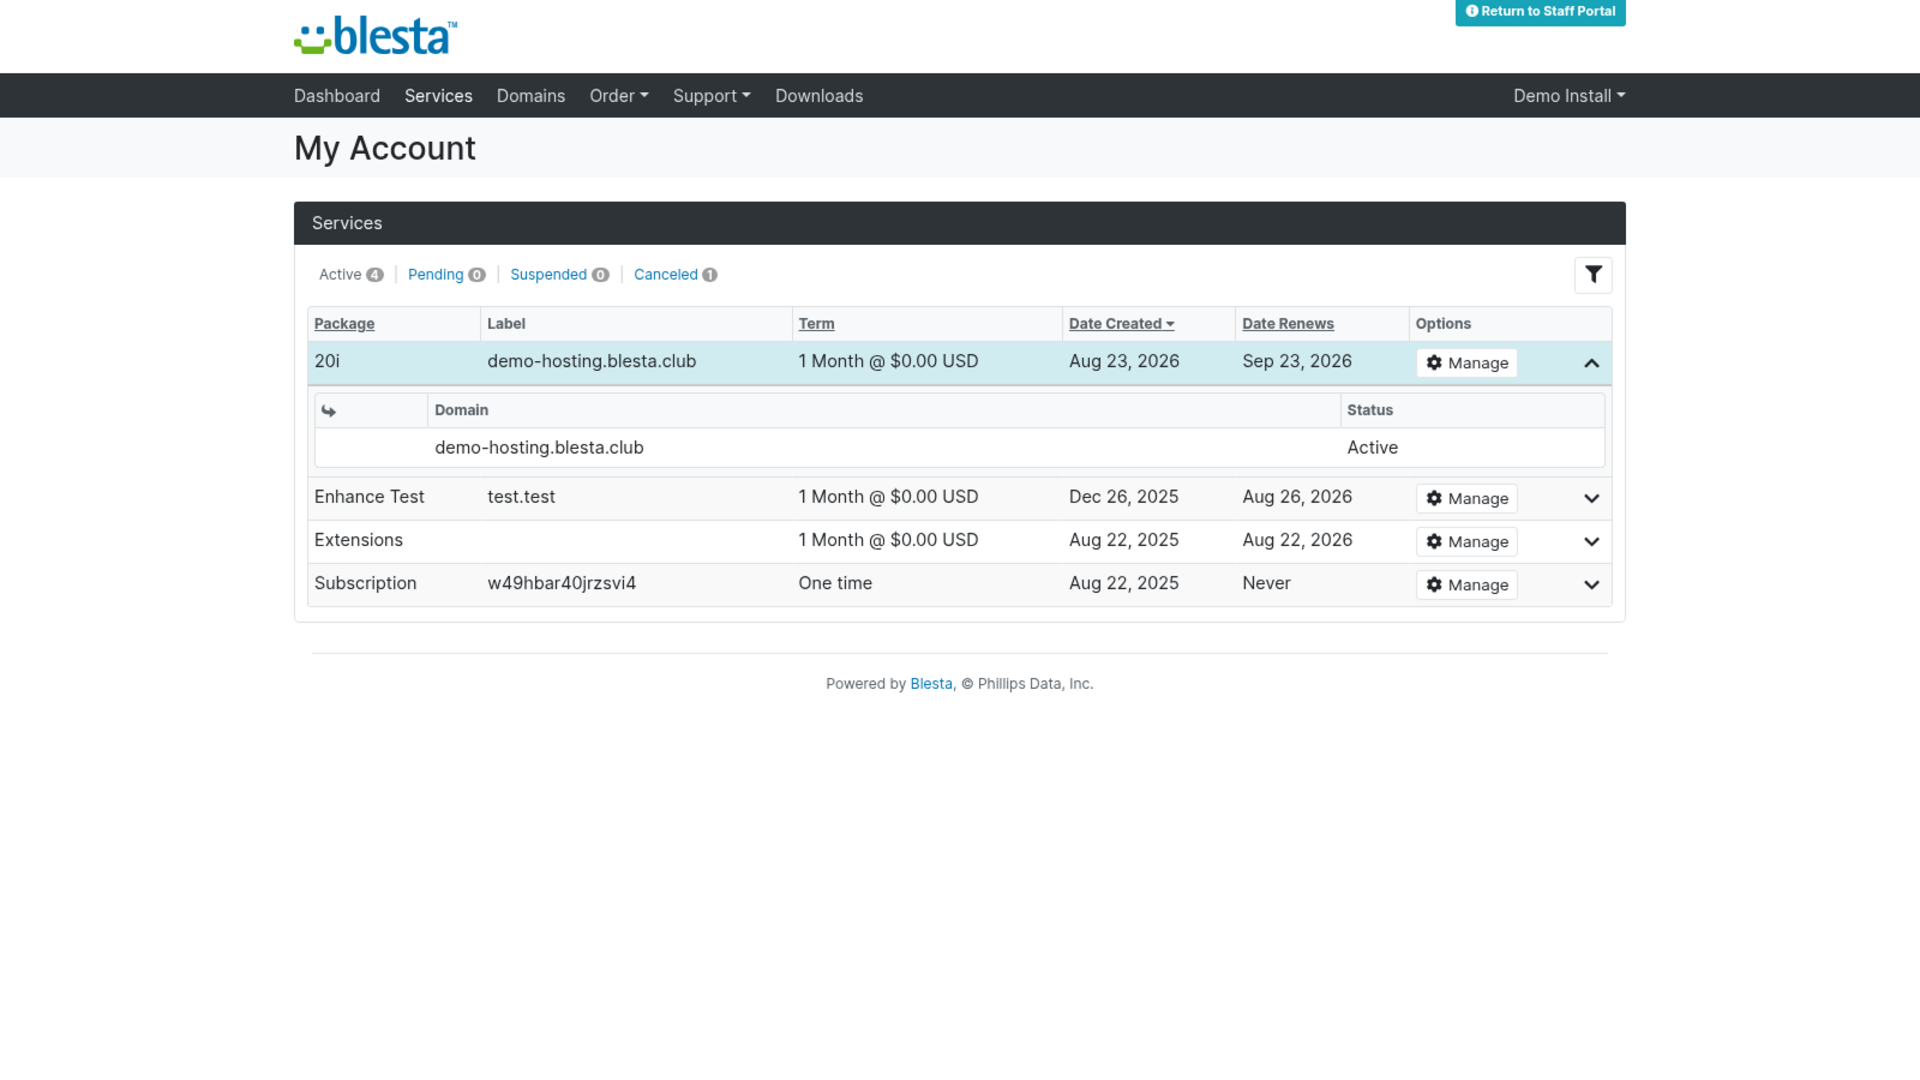
Open a client's profile and find their 20i service in the Services list - its row expands to show the Domain and current Status (Active, Suspended, Cancelled, Pending, or In Review) at a glance, without opening the service.
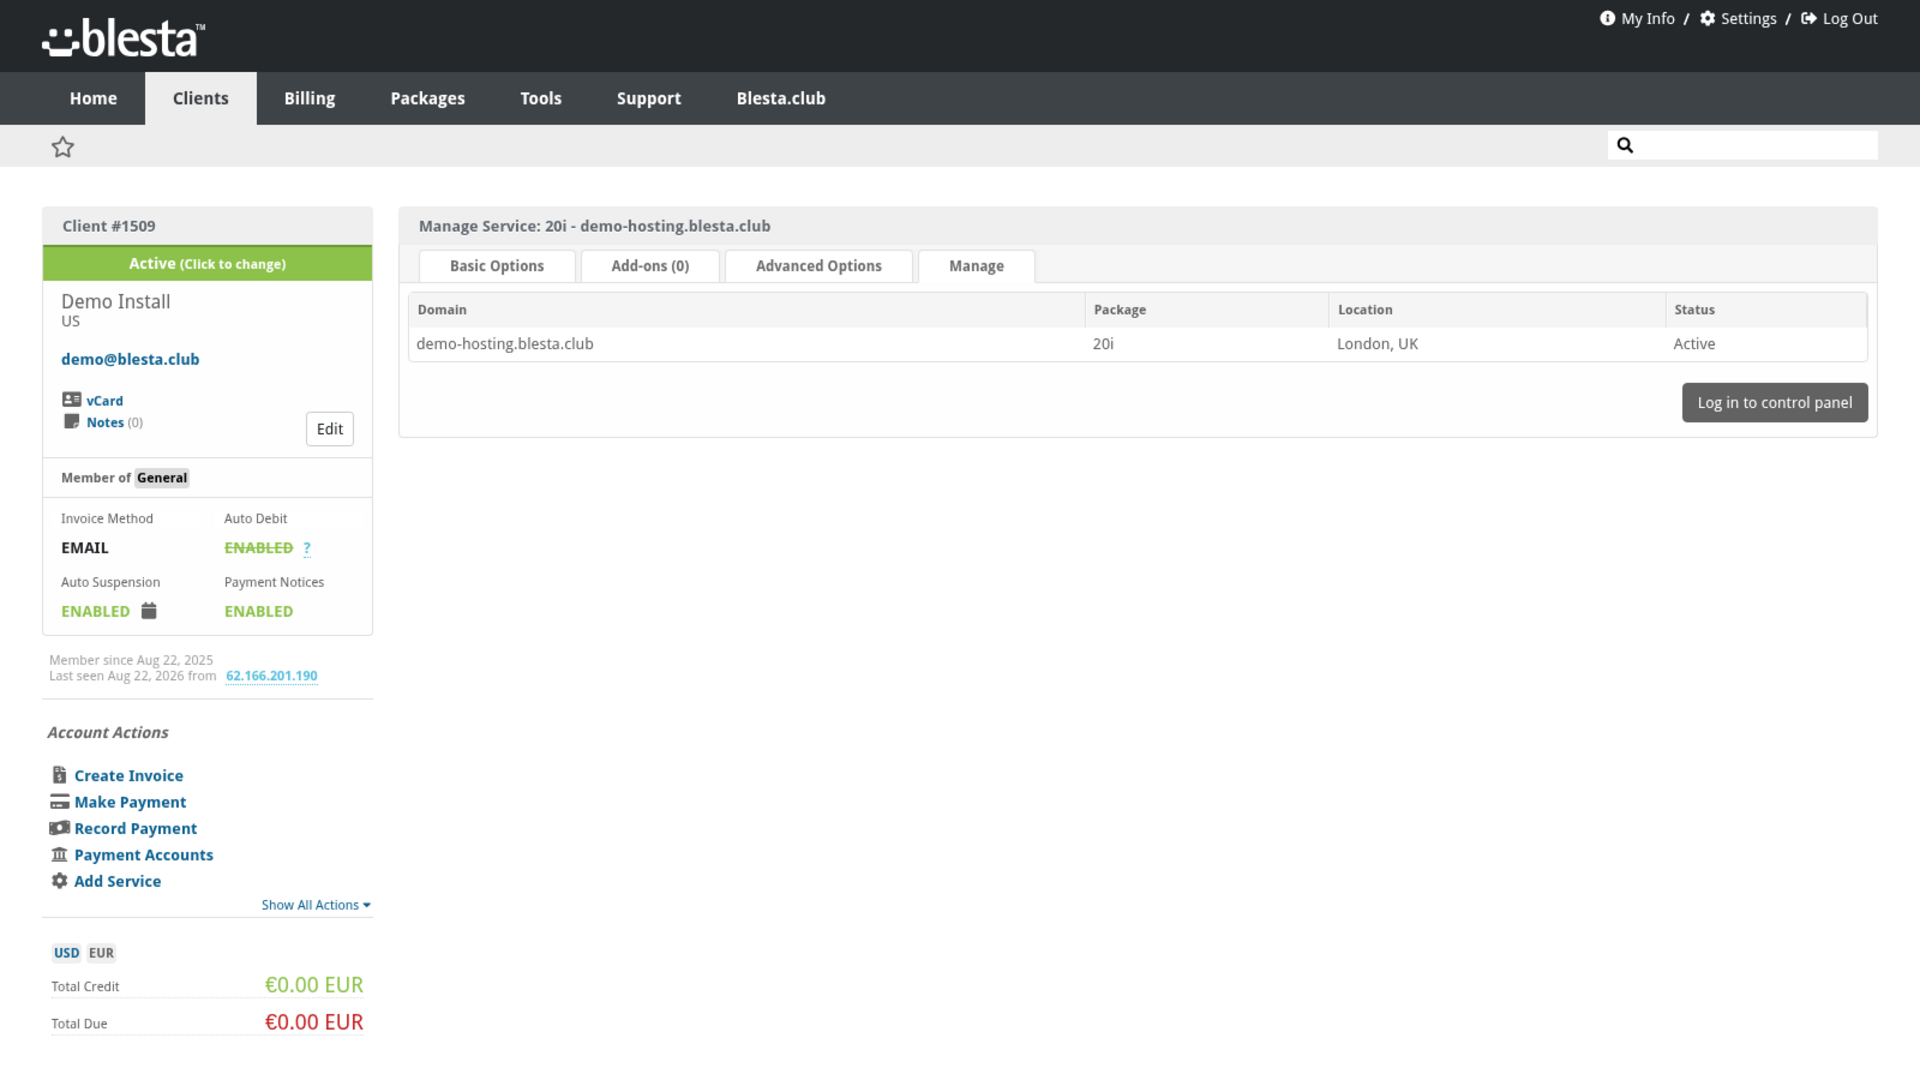
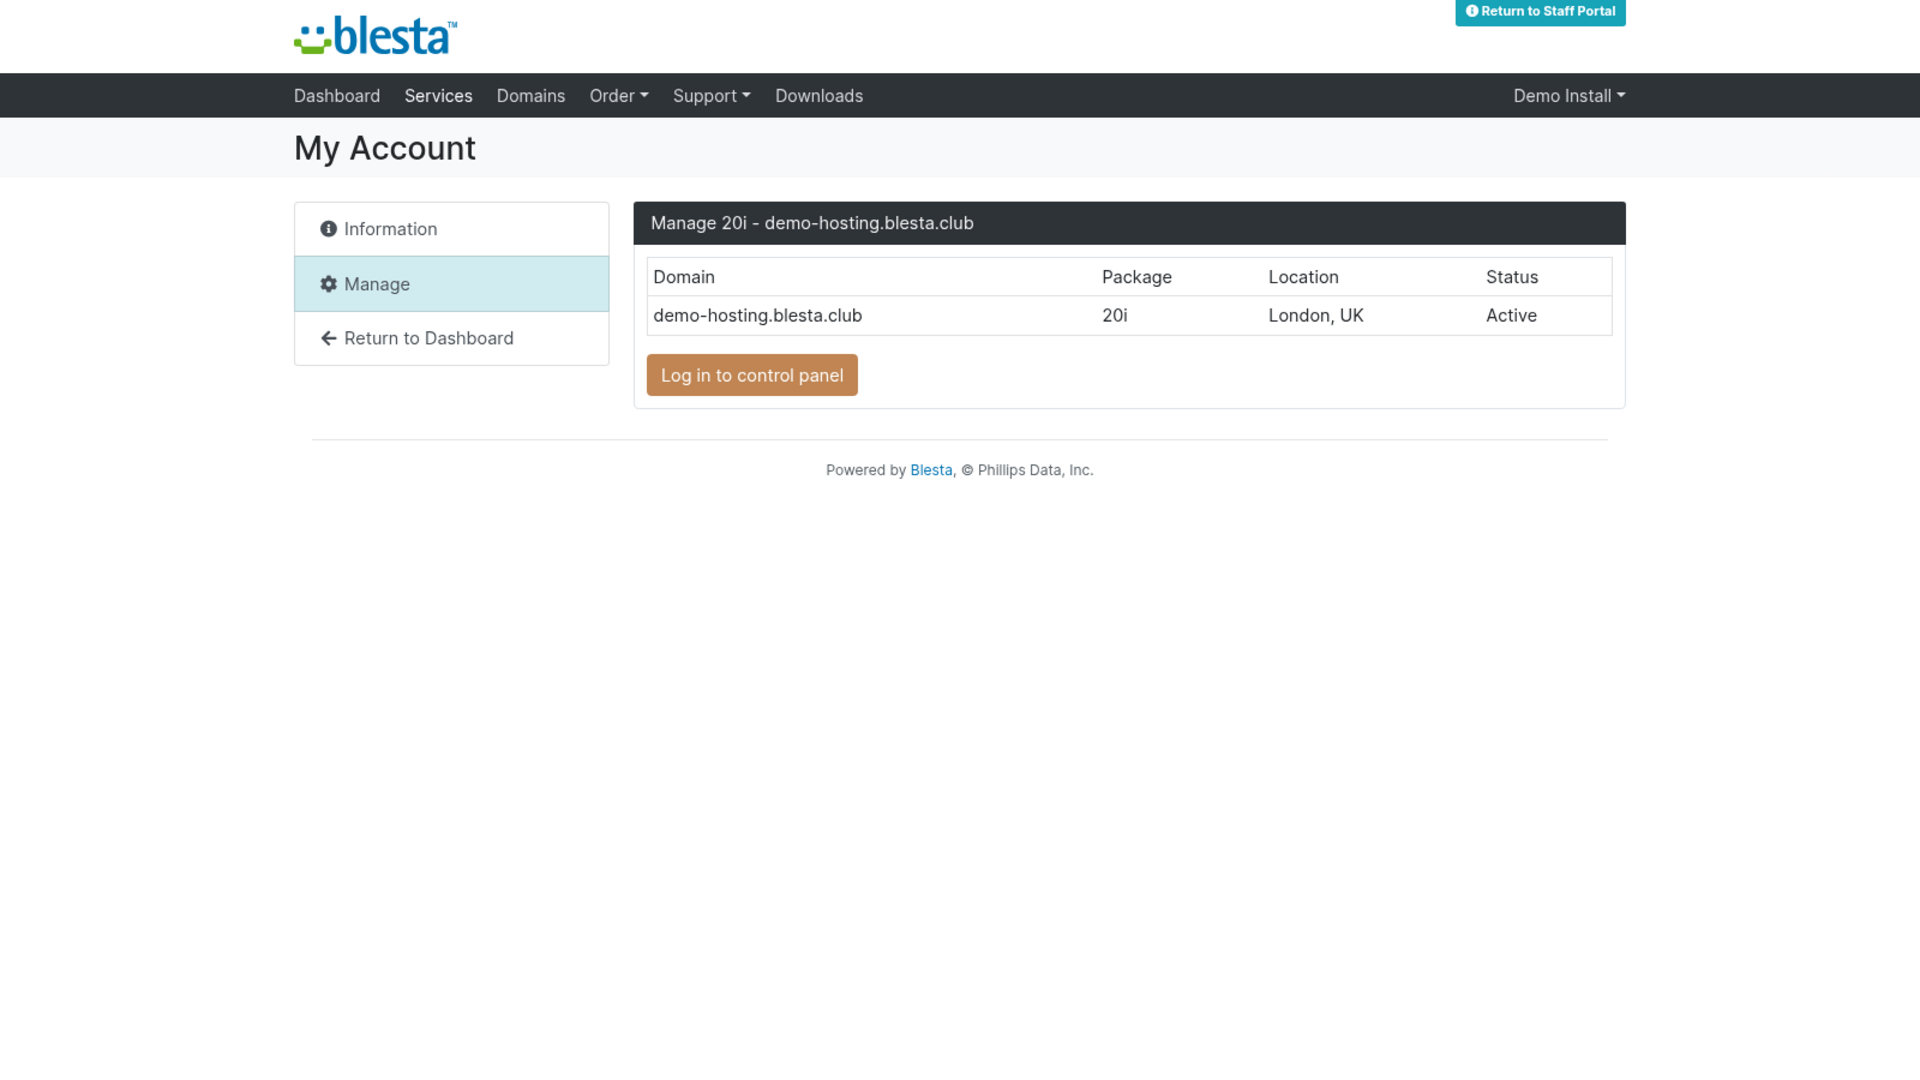
Open the service and click its Manage tab for the full picture: Domain, Package, Location and Status, plus a Log in to control panel button that opens the client's branded StackCP control panel in a new tab, matched to them automatically, for when you need to take a look on their behalf.
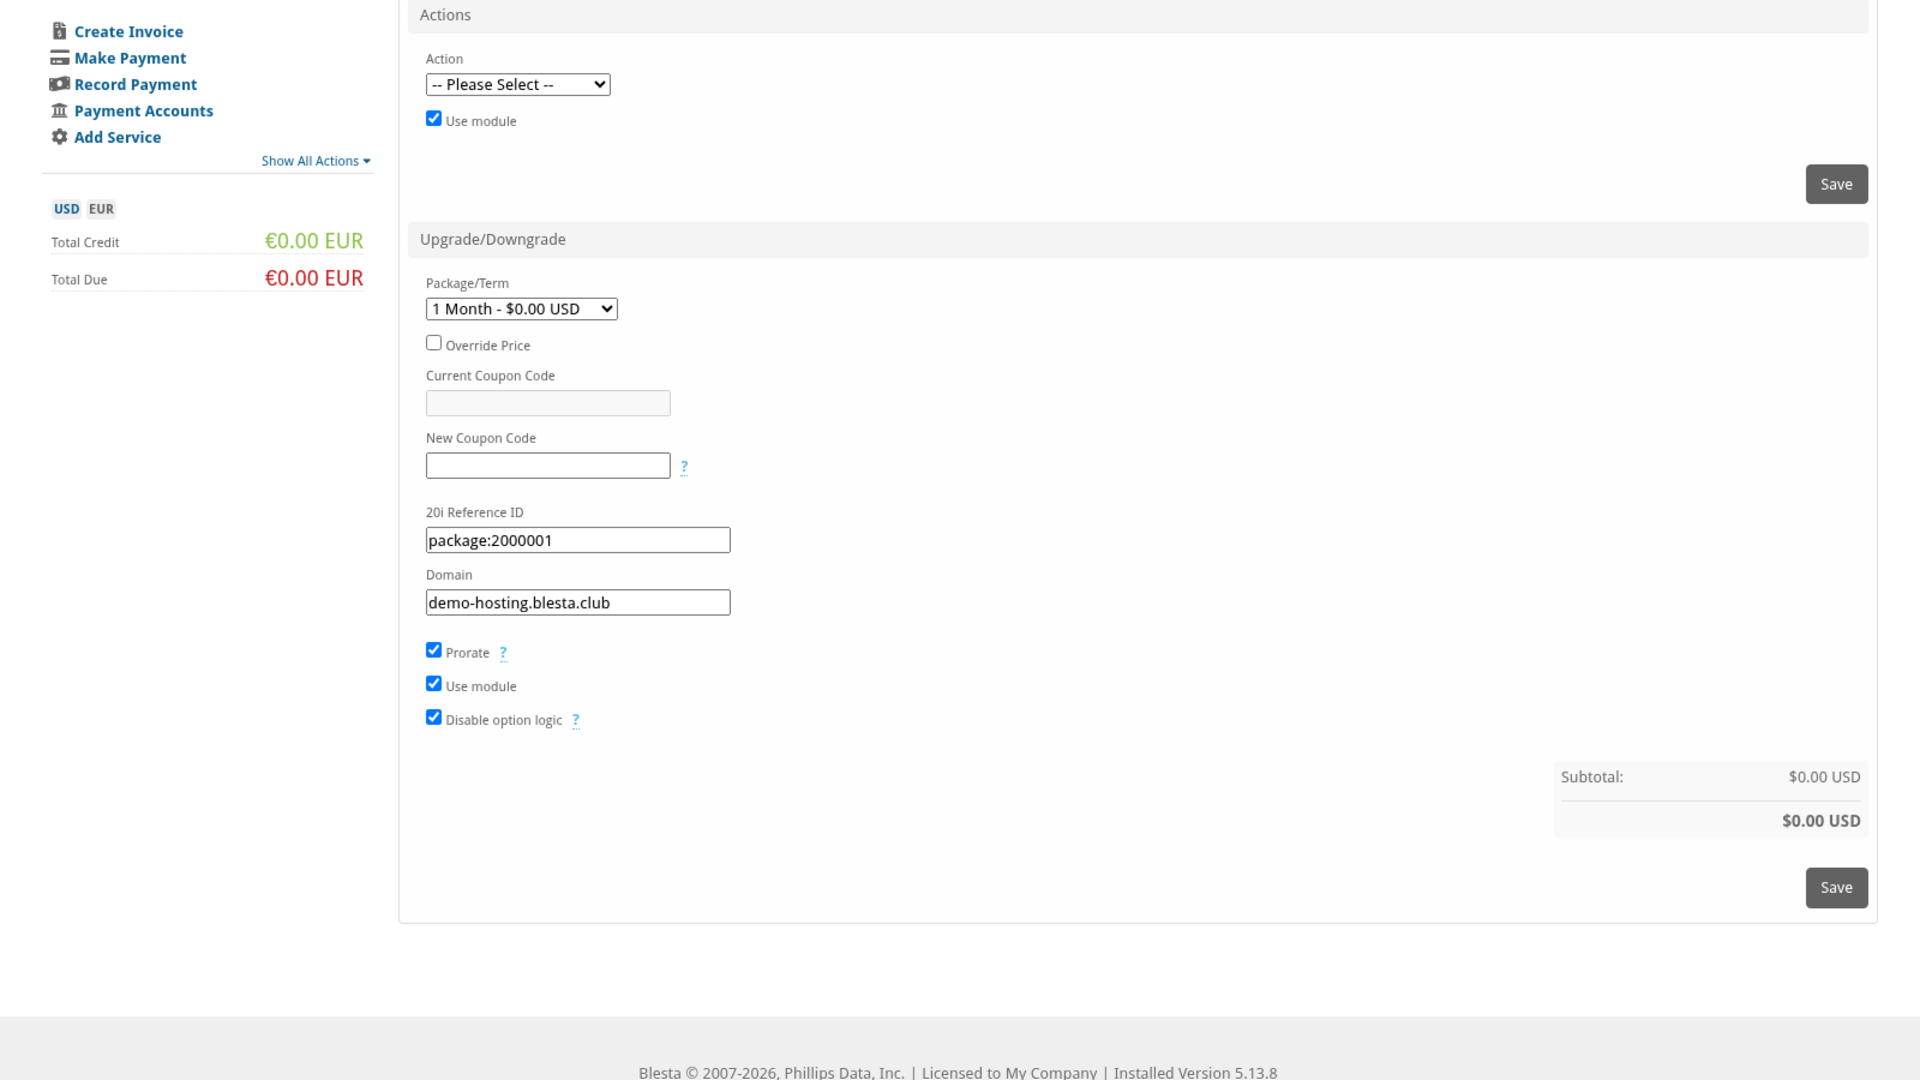
Editing the service lets you change the stored Domain and the 20i Reference ID directly, useful for attaching an existing 20i package to a Blesta service without reprovisioning it.
For your clients
Ordering hosting
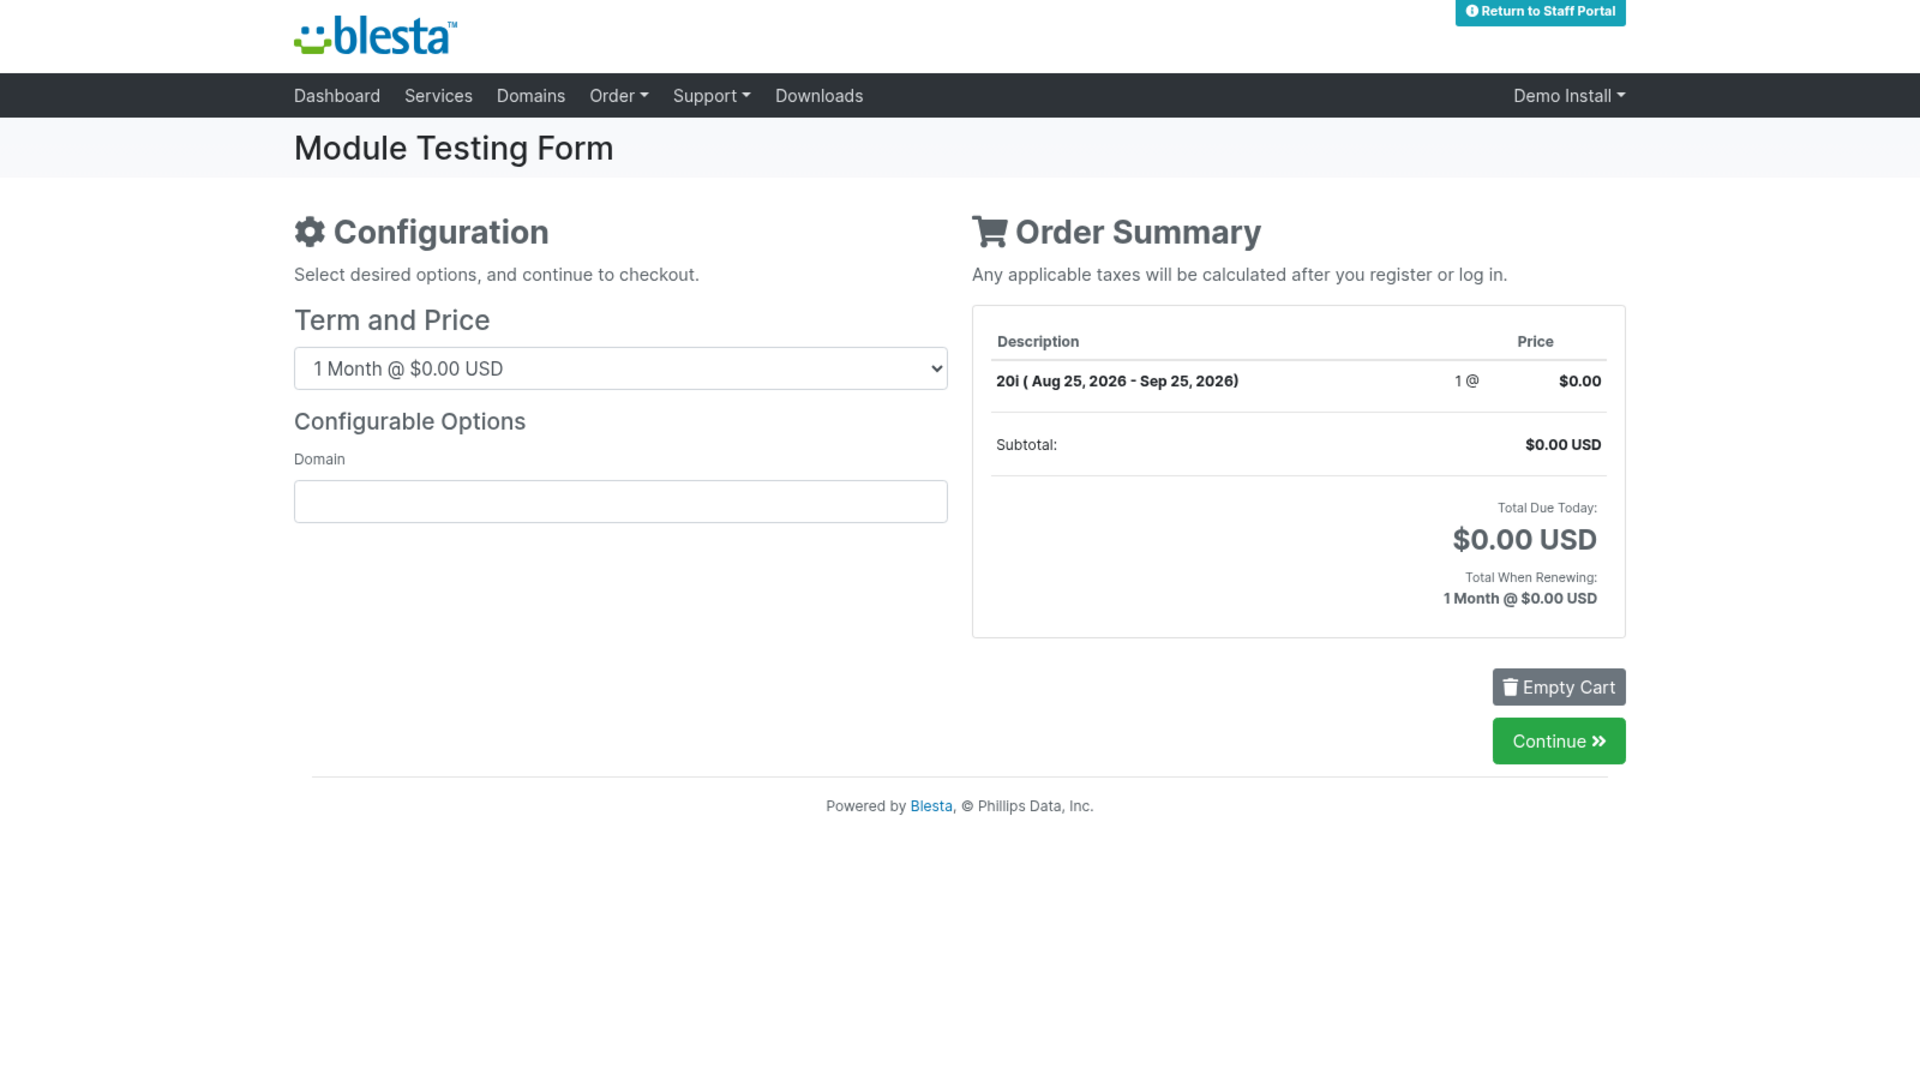
When you order 20i hosting, you'll be asked to enter the domain you want the hosting set up for - this becomes the primary domain of your new hosting account.
Viewing your hosting service
From your Services list, your 20i hosting's row expands to show its Domain and current Status.
Logging in to your control panel
Open the service and click its Manage tab, then Log in to control panel. This opens your branded StackCP control panel in a new tab - you're logged in automatically, with no separate control panel password to remember.
Good to know
- Datacentre locations are currently London, UK and Dallas, US - the two 20i offers today.
- Suspending, reactivating, cancelling, or changing the plan on a service all push the matching action to 20i automatically; there is nothing further to do on the 20i side.
- A service created while an account's Mock API mode was switched on is tagged as a demo record. If you later disable Mock API on that account, actions on that particular service are blocked with a clear message rather than being sent to your live 20i account - re-provision the service for real to lift that.
- While an account is running in Mock API mode, the Log in to control panel button still finishes by redirecting to 20i's real login page - mock mode only fakes the API calls that build the link, not the destination itself, so this one action needs live credentials to see all the way through.
v3.0.0 - 2026-10-11
PHP 8.2 - 8.4 · Blesta 6.x
Added support for Blesta 6. This version requires Blesta 6.0 or later; Blesta 5 installs should stay on version 2.x
Updated the account list, the add and edit account forms, the staff service info panel, the staff Manage tab and the package Module tab fields to the Blesta 6 admin theme, including dark mode
Changed the Edit and Delete links on the account list to buttons, and added a Back button to the add and edit account forms
Fixed the delete confirmation for an account group asking about an account
Fixed packages set to "Choose Automatically" failing to provision through an account group: the group now hands out its first account (the Add/Edit Account Group form offers "First Account in the Group" as the order), and groups created under an older version work without being re-saved
Renamed the add and edit account form titles to "Add 20i Account" and "Edit 20i Account"
v2.0.0 - 2026-09-11
PHP 7.2 - 7.4, 8.1 - 8.4 · Blesta 5.x
Fixed the control panel access token being written to the module log in cleartext on every service page
Removed the reseller API key from the email tags, where it rendered decrypted into any template that used it
Fixed API failures with an unrecognised response body showing an empty error message
Added a request timeout so a stalled 20i response can no longer hold a page or a cron run open
Added a service management tab with a control panel login button that mints an SSO session only when clicked
Added support for Blesta configurable options overriding the package type and location
Added named module rows so multi-account installs are labelled by name instead of an API key
Added a welcome email template
Added Managed WordPress package types via a package platform choice
Service info panels now show the domain and status only
v1.0.0 - 2024-09-22
PHP 7.2 - 7.3, 8.1 - 8.4 · Blesta 5.x
Blesta Club release
Pricing Options
Get exactly what you need and want.
Requires PHP 8.2 - 8.4 · Blesta 6.x
Included In
Value: £42.3
- +51 Other Extensions
- Additional Discounts
- Included Support & Updates
Leased
- Partially Encoded
- Full Functionality
- Included Support & Updates
Owned
- Partially Encoded
- Buy Once Use Forever
- 1 Year Support & Updates
Owned - Source
- Source Available
- Buy Once Use Forever
- 1 Year Support & Updates
Not sure whether to lease or own? Our FAQ explains how the licence types differ.
Reviews
What our customers say
(0 customer reviews)
Seems like this extension doesn't have reviews yet...
Be one of the firsts to leave a review!
It is possible to leave a review only if you have purchased this extension or a Club tier which contains it.
We reserve the right to alter wording or formatting for presentation.
We will discuss any changes made and offer the option to withdraw review text if the changes can't be agreed on.
It may take up to 1 hour for a review to appear or update due to caching.
You might also like
More extensions to explore

Module
BunnyDNS
Integrate BunnyDNS for automatic DNS provisioning and management.
PHP 8.2 - 8.4 · Blesta 6.x

Module
Cloudmini
Integrate Cloudmini for automatic cloud hosting provisioning.
PHP 7.2 - 7.4, 8.1 - 8.4 · Blesta 5.x

Module
Convoy Panel
Provision servers using Convoy, a Proxmox based VPS management panel
PHP 8.2 - 8.4 · Blesta 6.x

Module
Datalix
Integrate Datalix module into your Blesta install to provision VPS servers.
PHP 8.2 - 8.4 · Blesta 6.x

Module
Enhance
Integrate Enhance for automatic provisioning and management.
PHP 8.2 - 8.4 · Blesta 6.x

Module
Hetzner Cloud
Integrate Hetzner Cloud for automatic server provisioning.
PHP 8.2 - 8.4 · Blesta 6.x