![]()
Esendex Messenger by Blesta.Club - Product Overview
Welcome, and thank you for choosing the Esendex Messenger! We're delighted to have you as a customer and are committed to ensuring you have a seamless experience. This guide aims to walk you through the installation and configuration of your new extension. If you're new to Blesta or encounter any issues, please don't hesitate to reach out for support.
Messenger Capabilities
The Esendex Messenger is designed to send SMS notifications for various events in Blesta, ensuring you stay informed and connected with your clients and team. The notifications are categorized as follows:
Client Messages
- Account Registration
- Description: Welcome notice sent for new account registrations.
- Auto-Debit Pending
- Description: Notice indicating an upcoming automatic payment.
- Invoice Delivery (Paid)
- Description: Notice containing the total amount of a paid invoice.
- Invoice Delivery (Unpaid)
- Description: Notice containing the total amount of an unpaid invoice.
- Invoice Notice (1st, 2nd, 3rd)
- Description: Reminder or late notice for invoice payments.
- Quote Delivery
- Description: Notice containing a quote number and link.
- Service Creation
- Description: Notice sent when a service is created.
- Service Scheduled Cancellation
- Description: Notice sent when a service is scheduled for cancellation.
- Service Suspension
- Description: Notice sent when a service is automatically suspended.
- Service Unsuspension
- Description: Notice sent when a service is automatically unsuspended.
Staff Messages
- Quote Approval
- Description: Notice sent after a quote is approved by the client.
Plugin Messages
- Order Received
- Plugin: Order System
- Description: Notice sent when an order is received.
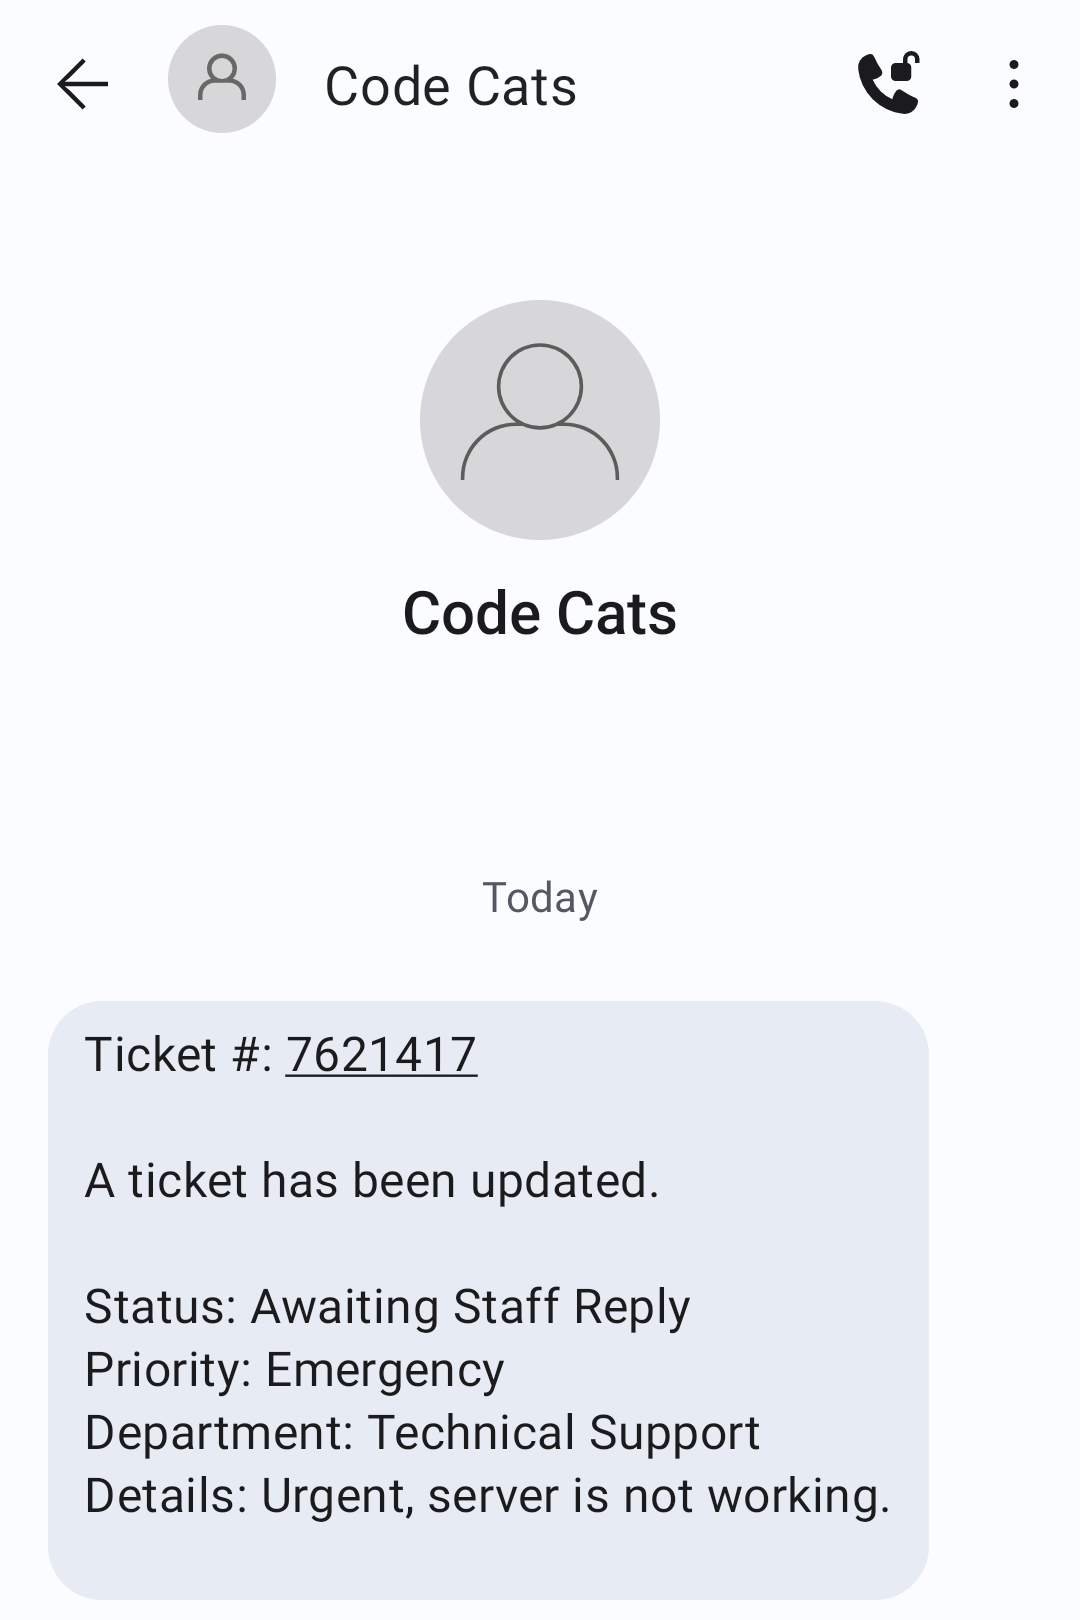
- Staff Ticket Assigned
- Plugin: Support Manager
- Description: Notice sent to a staff member when a ticket is assigned to them.
- Staff Ticket Updated
- Plugin: Support Manager
- Description: Notice sent to a staff member when a ticket is updated.
Setting Up the Messenger
Install the Messenger
-
Download the Messenger:
- Obtain the Esendex Messenger from the download section of the client area.
-
Upload to Blesta:
- Upload the Esendex Messenger to your Blesta messenger directory:
/var/www/html/blesta/components/messengers/esendex/
- Upload the Esendex Messenger to your Blesta messenger directory:
-
Install the Messenger:
- Log in to your admin Blesta account and navigate to Settings > Messengers.
- Find the Esendex Messenger and click the "Install" button.
Configure the Messenger
-
Manage the Messenger:
- Navigate to Settings > Messengers (
/admin/settings/company/messengers/installed/). - Find the "Esendex" Messenger and click on "Manage".
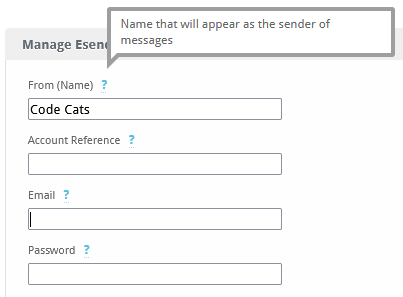
- Input your Account Reference, Email, and Password. If you don't know how to find them, refer to the instructions below.
- Navigate to Settings > Messengers (
-
Messenger Configuration:
- Under "Messengers", click on "Messenger Configuration".
- Assign Esendex to the SMS Message Type (currently the only one supported by Blesta).
-
Enable Notifications:
- Under "Messengers", go to "Message Templates".
- Ensure the relevant templates are enabled.
Finding Your Account Reference, Email, and Password
-
Account Reference:
- Click on "Administration" at the top right inside Esendex. This will open a page with your accounts. The Account Reference is next to your account name and looks like EX0000000.
-
Email:
- Use your Esendex account email.
-
Password:
- Go to "My Details" at the top right inside Esendex.
- Scroll down and click "Generate new API password" under "Change API password".
Troubleshooting Notifications
-
Order Notifications:
- Go to Billing > Overview (
/admin/billing/index/). - Scroll to the bottom. You should see an "Orders" panel. In its corner, there is a cogwheel for changing its settings. Click on it, then under "Order Notifications" enable "Messengers". Click "Update Settings" to save your changes.
- Go to Billing > Overview (
-
Ticket Notifications:
- Go to Support > Departments (
/admin/plugin/support_manager/admin_departments/). - Edit your desired department and check "Send Auto-Response Emails for New Tickets". Save your changes by clicking "Edit Department".
- Go to Support > Departments (
-
Staff Ticket Notifications:
- Go to Support > Staff (
/admin/plugin/support_manager/admin_staff/). - Edit your desired staff member and check which ticket priorities should be sent to the Messenger. Save your changes by clicking "Edit Staff".
- Go to Support > Staff (
Contact Us
If you encounter any issues or have suggestions for improving the extension, please get in touch with us. We are committed to providing robust updates and welcome customer feedback.
![]()
Esendex Messenger by Blesta.Club - Installation Guide
Welcome, and thank you for purchasing the Esendex Messenger! We're delighted to have you as a customer and are committed to ensuring you have a seamless experience. This README aims to guide you through the installation of your new extension. If you're new to Blesta or encounter any issues, please don't hesitate to reach out for support.
Installation Guide
For detailed instructions on how to install the Esendex Messenger, please ensure you have the license manager installed for leased extensions and then follow these steps:
-
Obtain the Messenger:
- Download the Esendex Messenger from the download section of the client area.
-
Upload to Blesta:
- Upload the Esendex Messenger to your Blesta messenger directory:
/var/www/html/blesta/components/messengers/esendex/
- Upload the Esendex Messenger to your Blesta messenger directory:
-
Install the Messenger:
- Log in to your Blesta admin account.
- Navigate to Settings > Messengers.
- Find the Esendex Messenger and click the "Install" button.
-
Configuration:
- Configure the Esendex Messenger according to your needs. Detailed configuration instructions can be found in the usage guide.
You're now done with the installation! Proceed to configure the messenger as needed by following the usage guide.
Contact Us
If you encounter any issues or have suggestions for improving the extension, please get in touch with us. We are committed to providing robust updates and welcome customer feedback.
![]()
Esendex Messenger by Blesta.Club - Updating Guide
To keep your Esendex Messenger up-to-date, follow the steps outlined below:
Updating Guide
-
Obtain the Updated Messenger:
- Download the latest version of the Esendex Messenger from the download section of my.blesta.club.
-
Upload to Blesta:
- Upload the updated Esendex Messenger to your Blesta messenger directory:
/var/www/html/blesta/components/messengers/esendex/
- Upload the updated Esendex Messenger to your Blesta messenger directory:
-
Update the Messenger:
- Log in to your Blesta admin account.
- Navigate to Settings > Messengers.
- Find the Esendex Messenger and click the "Update" button.
No additional changes are needed outside of updating the files. Any breaking changes will be communicated to clients.
Keep your Esendex Messenger up-to-date to ensure you have the latest features and improvements.
Contact Us
If you encounter any issues or have suggestions for improving the extension, please get in touch with us. We are committed to providing robust updates and welcome customer feedback.
![]()
Esendex Messenger by Blesta.Club - Usage Guide
Once your Esendex Messenger is installed, you'll want to configure it to suit your needs. Follow the steps below for a comprehensive setup.
Messenger Capabilities
The Esendex Messenger is designed to send SMS notifications for various events in Blesta, including:
Client Messages
- Account Registration
- Description: Welcome notice sent for new account registrations.
- Auto-Debit Pending
- Description: Notice indicating an upcoming automatic payment.
- Invoice Delivery (Paid)
- Description: Notice containing the total amount of a paid invoice.
- Invoice Delivery (Unpaid)
- Description: Notice containing the total amount of an unpaid invoice.
- Invoice Notice (1st, 2nd, 3rd)
- Description: Reminder or late notice for invoice payments.
- Quote Delivery
- Description: Notice containing a quote number and link.
- Service Creation
- Description: Notice sent when a service is created.
- Service Scheduled Cancellation
- Description: Notice sent when a service is scheduled for cancellation.
- Service Suspension
- Description: Notice sent when a service is automatically suspended.
- Service Unsuspension
- Description: Notice sent when a service is automatically unsuspended.
Staff Messages
- Quote Approval
- Description: Notice sent after a quote is approved by the client.
Plugin Messages
- Order Received
- Plugin: Order System
- Description: Notice sent when an order is received.
- Staff Ticket Assigned
- Plugin: Support Manager
- Description: Notice sent to a staff member when a ticket is assigned to them.
- Staff Ticket Updated
- Plugin: Support Manager
- Description: Notice sent to a staff member when a ticket is updated.
Setting Up the Messenger
-
Configure the Messenger:
- Navigate to Settings > Messengers (
/admin/settings/company/messengers/installed/). - Find the "Esendex" Messenger and click on "Manage".
- Input your Account Reference, Email, and Password. If you don't know how to find them, refer to the instructions below.
- Navigate to Settings > Messengers (
-
Messenger Configuration:
- Under "Messengers", click on "Messenger Configuration".
- Assign Esendex to the SMS Message Type (currently the only one supported by Blesta).
-
Enable Notifications:
- Under "Messengers", go to "Message Templates".
- Ensure the relevant templates are enabled.
You're now done with the installation! Proceed to configure the messenger as needed by following the usage guide.
Finding Your Account Reference, Email, and Password
-
Account Reference:
- Click on "Administration" at the top right inside Esendex. This will open a page with your accounts. The Account Reference is next to your account name and looks like EX0000000.
-
Email:
- This is your Esendex account email.
-
Password:
- Go to "My Details" at the top right inside Esendex. Scroll down and click "Generate new API password" under "Change API password".
Troubleshooting Notifications
Not getting order notifications?
- Order Notifications:
- Go to Billing > Overview (
/admin/billing/index/). - Scroll to the bottom. You should see an "Orders" panel. In its corner, there is a cogwheel for changing its settings. This.
- Click on it, then under "Order Notifications" enable "Messengers". Enable "Messengers".
- Click "Update Settings" to save your changes. Update Settings.
- Go to Billing > Overview (
Not getting ticket notifications?
-
Ticket Notifications:
- Go to Support > Departments (
/admin/plugin/support_manager/admin_departments/). - Edit your desired department and check "Send Auto-Response Emails for New Tickets". Send Auto-Response Emails for New Tickets.
- Save your changes by clicking "Edit Department". Edit Department.
- Go to Support > Departments (
-
Staff Ticket Notifications:
- Go to Support > Staff (
/admin/plugin/support_manager/admin_staff/). - Edit your desired staff member and check which ticket priorities should be sent to the Messenger. Ticket Priorities.
- Save your changes by clicking "Edit Staff". Edit Staff.
- Go to Support > Staff (
Contact Us
If you encounter any issues or have suggestions for improving the extension, please get in touch with us. We are committed to providing robust updates and welcome customer feedback.
--- v1.0.0 - 2024-09-22 ---
Blesta Club release
Pricing Options
Get exactly what you need and want.
Bundled
- +30 Other Extensions
- Additional Discounts
- Included Support & Updates
Leased
- Partially Encoded
- Full Functionality
- Included Support & Updates
Owned
- Partially Encoded
- Buy Once Use Forever
- 1 Year Support & Updates
Owned - Source
- Source Available
- Buy Once Use Forever
- 1 Year Support & Updates
Reviews
What our customers say
(0 customer reviews)
Seems like this extension doesn't have reviews yet...
Be one of the firsts to leave a review!
It is possible to leave a review only if you have purchased this extension or a bundle which contains it.
We reserve the right to alter wording or formatting for presentation.
We will discuss any changes made and offer the option to withdraw review text if the changes can't be agreed on.
It may take up to 1 hour for a review to appear or update due to caching.