


![]()
Enhance Module by Blesta.Club - Product Overview
Welcome, and thank you for choosing the Enhance Module! This guide provides an overview of the Enhance Module and how it integrates with Blesta to manage services using the API for automating your hosting needs. If you're new to Blesta or encounter any issues, please don't hesitate to reach out for support.
Module Capabilities
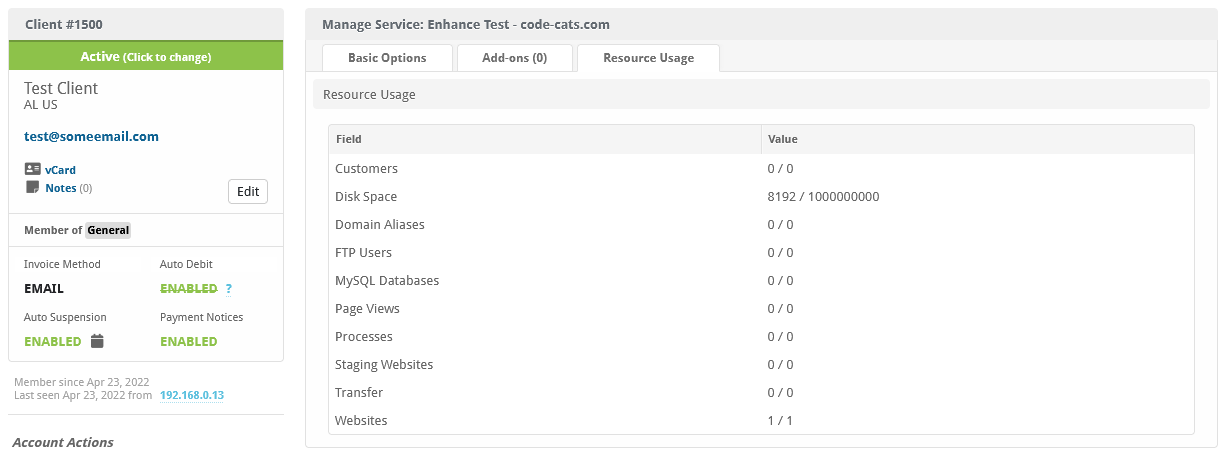
The Enhance Module integrates with Enhance, enabling clients to manage specific services provided by yourself on your Enhance cluster. Through this module, users can interact with Enhance’s API directly from Blesta. This includes SSO and resource usage display within the client area!
Key Features
- API Integration: The module allows for API interactions between Blesta and Enhance.
- Service Management: Manage specific services tied to the Enhance platform.
- Config Options: Allow server groups to be chosen at order to allow the client to pick a location
- Subscription Only Mode: No domain required to provision, Will create a plan for the client to setup afterwards!
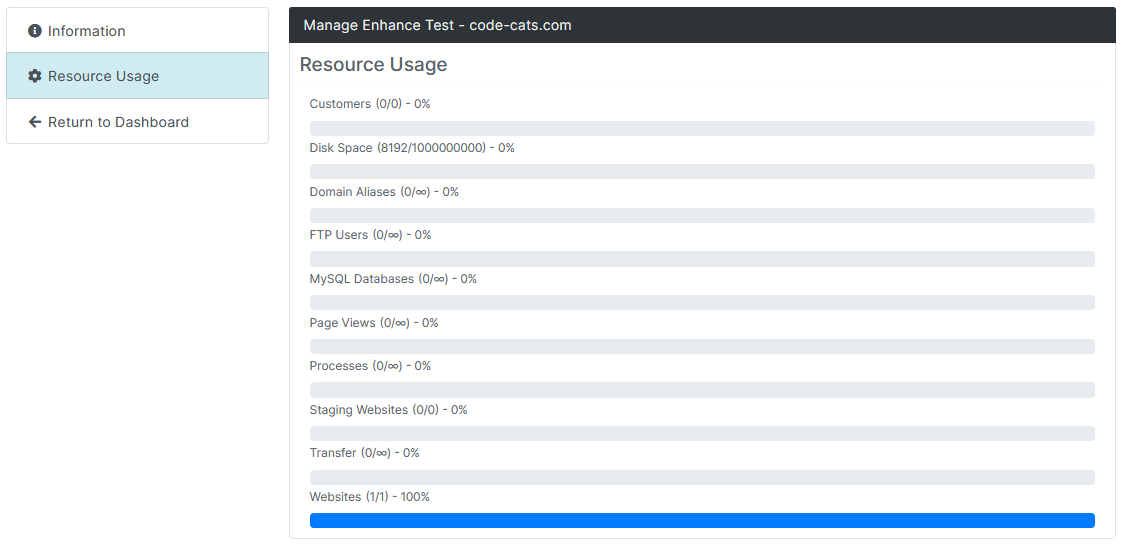
- Client Side: Clients will have access to the SSO for Enhance and be able to view usage statistics of their plan.
Things to Note
- Access Token: You will need to obtain an access token from your Enhance account to authenticate and manage services.
- Existing accounts May be added by editing the Subscription Id & Website Id in the advanced options of the service details
Contact Us
If you encounter any issues or have suggestions for improving the module, please get in touch with us. We are committed to providing robust updates and welcome customer feedback.
![]()
Enhance Module by Blesta.Club - Installation Guide
This guide provides step-by-step instructions for installing the Enhance Module, allowing your clients to manage services through the Enhance API.
Prerequisites
- Enhance access token: You will need an access token from your Enhance control panel.
Installation Steps
1. Get Your Enhance access token
- Log in to your Enhance account.
- Navigate to the /settings/access-tokens section.
- Copy your access token, which will be needed during configuration.
2. Download the Module
- Download the Enhance Module from Blesta Club.
3. Upload the Module to Blesta
-
Upload the module to your Blesta directory:
/var/www/html/blesta/components/modules/enhance/4. Install the Module
-
Log into your Blesta admin account.
-
Navigate to Settings > Modules.
-
Find Enhance Module under the "Available" tab and click Install.
5. Configure the Module
- After installation, navigate to Settings > Modules > Installed > Enhance > Manage.
- Enter your Enhance access token.
- Save the settings.
The Enhance Module is now installed and ready for use.
Contact Us
If you encounter any issues or have suggestions for improving the module, please get in touch with us. We are committed to providing robust updates and welcome customer feedback.
![]()
Enhance Module by Blesta.Club - Update Guide
To ensure you're always using the latest version of the Enhance Module, follow these steps to update the module in your Blesta installation.
Steps for Updating the Module
1. Download the Latest Version
- Visit the download section of my.blesta.club to obtain the latest version of the Enhance Module.
2. Upload the Updated Module
- Upload the updated files to your Blesta installation directory, replacing the existing files:
/var/www/html/blesta/components/modules/enhance/
3. Update the Module in Blesta
- Log in to your Blesta admin account.
- Navigate to Settings > Modules.
- Locate the Enhance Module in the list and click the "Upgrade" or "Update" button if available.
4. Clear Cache
- Once the files are uploaded and the module is updated, clear the Blesta cache by navigating to Settings > System and selecting "Clear Cache."
Testing the Update
-
Test Mode:
- Use a test service to verify that the module is functioning correctly after the update.
-
Service Management Testing:
- Perform a test by managing a service to ensure the module is working as expected.
Troubleshooting Update Issues
-
Missing or Incorrect Files:
- If you experience issues, ensure all files have been uploaded correctly and verify file permissions.
-
Access Token Issues:
- If service management actions are failing, check that the correct Access Token is configured in the module settings.
-
Compatibility Issues:
- Confirm that the updated version of the module is compatible with your current Blesta version. Check the changelog for any version-related notes.
Contact Us
If you encounter any issues during the update process or have suggestions for improving the module, please reach out to us. We are dedicated to providing robust updates and value customer feedback.
![]()
Enhance Module by Blesta.Club - Usage Guide
Welcome, and thank you for purchasing the Enhance Module! This guide will walk you through how to use the module to manage services via the Enhance API. If you're new to Blesta or encounter any issues, please don't hesitate to reach out for support.
Using the Enhance Module
Once installed and configured, the Enhance Module enables your clients to interact with their services through Blesta.
Setting Up the Enhance Module
Important Note:
Enhance automatically determines which server to provision, so you only need to add your master or main server to Blesta. All packages should be assigned to this server for provisioning - You can override this with configurable options later in this guide.
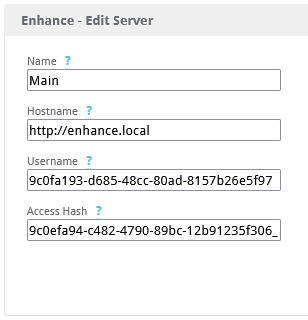
Creating a Server:
-
Go to Server Settings:
- Navigate to
/admin/settings/company/modules/installed/and click "Manage" on the "Enhance" module.
- Navigate to
-
Add a New Server:
- Click Add Server in the top right corner.
-
Fill Out Required Information:
- Name: Choose a name for the server as it will appear in the admin panel (can be anything you prefer).
- Hostname: Provide the full URL of your Enhance instance, including
http(s)://. Example:https://web.mycompany.com. - Username (orgId): This is your organization ID. Refer to the "Quick Support" section below to find it. It is typically formatted like
xxxxxxxx-xxxx-xxxx-xxxx-xxxxxxxxxxxx. - Access Hash: This is your Access Token. Refer to the "Quick Support" section below to learn how to find it. It is typically formatted like
xxxxxxxx-xxxx-xxxx-xxxx-xxxxxxxxxxxx_xxxxxxxxxxxxxxxxxxxxxxxxxxxxxxxxxxxxxxxxxxxxxxxx.
Additional Notes
-
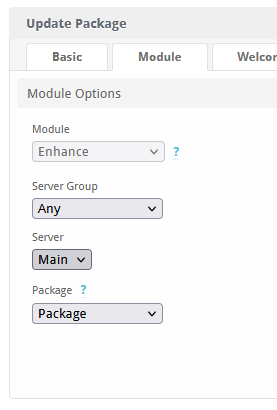
Config options
- The option name needs to be
server_group_idand your values for each location can be found on the module tab of Blesta (/admin/packages/edit/XXX) your values will look similar to:xxxxxxxx-xxxx-xxxx-xxxx-xxxxxxxxxxxxand be listed below the Server Group ID's
- The option name needs to be
-
Subscription Only Mode
- Located on the module tab of Blesta (/admin/packages/edit/XXX) You'll see a Subscription Only check box, this allows you to set a package which doesn't require a domain, The user can set all that up afterwards within Enhance!
Quick Support
Where to Find Your orgId and Access Token
-
Log In to Enhance:
- Access your Enhance Panel with an admin account.
-
Find Your orgId:
- Go to Settings > Access Tokens or navigate directly to
/settings/access-tokens. - The orgId is located in the blue information box under "Access token usage" and is noted as "Org ID: {your_id}".
- Go to Settings > Access Tokens or navigate directly to
-
Create and Retrieve Access Token:
- In the top right corner, click on Create Token.
- Set an expiry date and choose the Super Admin role, then click on Create.
- Copy the generated access token. This is your Access Hash in Blesta.
Configurable options
"server_group_id" - Set which server group to provision to
Email tags
- "module": ["name", "hostname", "username", "access_hash"],
- "package": ["package_id", "staging"],
- "service": ["website_id", "customer_id", "subscription_id", "email", "password", "domain"]
Troubleshooting Common Issues
API Connection Issues:
- Ensure that the Enhance API key is correctly entered and that the account has sufficient permissions. Ensure both servers can communicate i.e no firewall!
SSO isn't working:
- This is most likely due to imported or manually created plans on Enhance. Check the Manage button next to the service and then under the Advanced tab ensure all information is accurate for that site.
Contact Us
If you encounter any issues or have suggestions for improving the module, please get in touch with us. We are committed to providing robust updates and welcome customer feedback.
--- v1.3.0 - 2025-10-27 ---
Added "Login To Panel" button under client management interface
Improved "Resource Usage" client tab interface
Changed service info password to hover to reveal
--- v1.2.0 - 2025-06-13 ---
Added support for upgrade/downgrade of packages
--- v1.1.2 - 2025-04-14 ---
Added "Customer ID" field when adding services for easier migration from other modules/billing platforms
Added better API request logging
--- v1.1.1 - 2025-03-02 ---
Fixed "Subscription Only" setting being inverted
--- v1.1.0 - 2025-01-05 ---
Added Server Group IDs on the package settings screen for easier configuration of configurable options
Added "Subscription Only" mode to package settings
"Subscription Only" feature sponsored by:
WP BUZZ - https://wpbuzz.com/
--- v1.0.1 - 2025-01-03 ---
Added Configurable Option support for Server Groups (server_group_id)
--- v1.0.0 - 2024-09-22 ---
Blesta Club release
Pricing Options
Get exactly what you need and want.
Bundled
- +43 Other Extensions
- Additional Discounts
- Included Support & Updates
Leased
- Partially Encoded
- Full Functionality
- Included Support & Updates
Owned
- Partially Encoded
- Buy Once Use Forever
- 1 Year Support & Updates
Owned - Source
- Source Available
- Buy Once Use Forever
- 1 Year Support & Updates
Reviews
What our customers say
(1 customer review)
I’ve really loved using this extension! It just works like a charm right from the start, which is super important to me. Plus, the support team is fantastic—I always feel so happy with the help I receive!
It is possible to leave a review only if you have purchased this extension or a bundle which contains it.
We reserve the right to alter wording or formatting for presentation.
We will discuss any changes made and offer the option to withdraw review text if the changes can't be agreed on.
It may take up to 1 hour for a review to appear or update due to caching.